Introduction
Brightcove has partnered with NAGRA to provide forensic watermarking as a feature in the Video Cloud platform. This will help protect your premium content from piracy and unauthorized content sharing. This feature also helps to quickly identify the source of a content leak, so that action can be taken.
The following diagram shows an overview:
- Content preparation
- The Forensic Watermark is an invisible watermark embedded into the video during transcoding using Nagra’s SDK
- Ingestion creates 2 VOD renditions, one with watermark A and another with watermark B; both renditions are part of the same title in Video Cloud
- Delivery
- When playing the content, the Forensic Watermark token is provided to the player, then included in the URL used to request content from the CDN
- The CDN interprets the token and delivers the video with the correct sequence of A/B segments to the viewer
Setup
The following setup is needed to support Brightcove's Forensic Watermarking solution:
-
Contact your Customer Success Manager:
- Make sure your account is enabled for Dynamic Delivery.
- Enable your account for Forensic Watermarking; This is a paid add-on to Video Cloud.
- Get your License Key from NAGRA.
- Generate a public-private key pair which will be used by the Forensic Watermarking JWT and decrypted by the CDN. (see below)
- Use the script provided by NAGRA to generate a JSON web token (JWT) for forensic watermarking. Be sure to manage how the forensic watermark token and each viewer are linked. You will need it when you configure your players and in the case of doing a detection service to know which viewer leaked the content illegally.
There are many ways to generate the public-private key pair. Here are some examples:
Example bash script:
Example script to generate the key pair:
#!/bin/bash
set -euo pipefail

NAME=${1:-}
test -z "${NAME:-}" && NAME="brightcove-forensic-watermarking-key-$(date +%s)"
mkdir "$NAME"

PRIVATE_PEM="./$NAME/private.pem"
PUBLIC_PEM="./$NAME/public.pem"
PUBLIC_TXT="./$NAME/public_key.txt"

ssh-keygen -t rsa -b 2048 -m PEM -f "$PRIVATE_PEM" -q -N ""
openssl rsa -in "$PRIVATE_PEM" -pubout -outform PEM -out "$PUBLIC_PEM" 2>/dev/null
openssl rsa -in "$PRIVATE_PEM" -pubout -outform DER | base64 > "$PUBLIC_TXT"

rm "$PRIVATE_PEM".pub

echo "Public key to saved in $PUBLIC_TXT"
Run the script:
$ bash keygen.sh
Example using Go
Example using the Go programming language to generate the key pair:
package main

  import (
    "crypto/rand"
    "crypto/rsa"
    "crypto/x509"
    "encoding/base64"
    "encoding/pem"
    "flag"
    "fmt"
    "io/ioutil"
    "os"
    "path"
    "strconv"
    "time"
  )

  func main() {
    var out string

    flag.StringVar(&out, "output-dir", "", "Output directory to write files into")
    flag.Parse()

    if out == "" {
      out = "rsa-key_" + strconv.FormatInt(time.Now().Unix(), 10)
    }

    if err := os.MkdirAll(out, os.ModePerm); err != nil {
      panic(err.Error())
    }

    priv, err := rsa.GenerateKey(rand.Reader, 2048)
    if err != nil {
      panic(err.Error())
    }

    privBytes := x509.MarshalPKCS1PrivateKey(priv)

    pubBytes, err := x509.MarshalPKIXPublicKey(priv.Public())
    if err != nil {
      panic(err.Error())
    }

    privOut, err := os.OpenFile(path.Join(out, "private.pem"), os.O_WRONLY|os.O_CREATE|os.O_TRUNC, 0600)
    if err != nil {
      panic(err.Error())
    }

    if err := pem.Encode(privOut, &pem.Block{Type: "RSA PRIVATE KEY", Bytes: privBytes}); err != nil {
      panic(err.Error())
    }

    pubOut, err := os.OpenFile(path.Join(out, "public.pem"), os.O_WRONLY|os.O_CREATE|os.O_TRUNC, 0600)
    if err != nil {
      panic(err.Error())
    }

    if err := pem.Encode(pubOut, &pem.Block{Type: "PUBLIC KEY", Bytes: pubBytes}); err != nil {
      panic(err.Error())
    }

    var pubEnc = base64.StdEncoding.EncodeToString(pubBytes)

    var pubEncOut = path.Join(out, "public_key.txt")
    if err := ioutil.WriteFile(pubEncOut, []byte(pubEnc+"\n"), 0600); err != nil {
      panic(err.Error())
    }

    fmt.Println("Public key saved in " + pubEncOut)
  }
Example using node.js
Example using node.js to generate the key pair:
var crypto = require("crypto");
  var fs = require("fs");

  var now = Math.floor(new Date() / 1000);
  var dir = "rsa-key_" + now;
  fs.mkdirSync(dir);

  crypto.generateKeyPair(
    "rsa",
    {modulusLength: 2048},
    (err, publicKey, privateKey) => {
      fs.writeFile(
        dir + "/public.pem",
        publicKey.export({ type: "spki", format: "pem" }),
        err => {}
      );
      fs.writeFile(
        dir + "/public_key.txt",
        publicKey.export({ type: "spki", format: "der" }).toString("base64") +
          "\n",
        err => {}
      );
      fs.writeFile(
        dir + "/private.pem",
        privateKey.export({ type: "pkcs1", format: "pem" }),
        err => {}
      );
    }
  );

  console.log("Public key saved in " + dir + "/public_key.txt");
Implementation
You can implement Forensic Watermarking with either Video Cloud Studio, or you can do it manually using the Brightcove APIs. The methods are detailed in the following sections.
Video Cloud Studio
Follow these steps to use Forensic Watermarking with Video Cloud Studio:
-
Forensic Watermarking is not linked to a specific ingest profile. You can use any Dynamic Delivery or Context Aware Encoding profile.
- Provide Brightcove with your NAGRA License Key. This License Key will be used during transcoding to generate the watermark.
- In the Upload module, select your ingest profile.
-
Check the Enable Forensic Watermark option.

Enable watermarking option -
Add the tag
watermarkedto the video, as this will make it much easier to identify the videos with forensic watermarking and to generate analytics reports on them: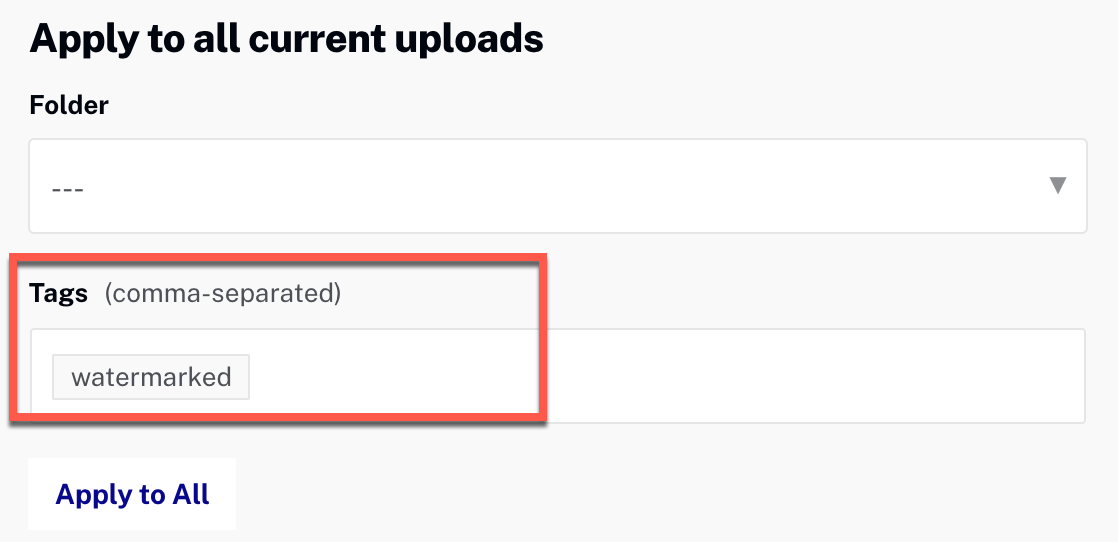
Add Tag -
Drag or browse for you video to start ingestion.
-
Configure your player.
This is where you will pass the NAGRA watermark token and the Viewer ID to the player. You can use either the Brightcove web player or the Native SDK players:
- Play content that has been ingested for Forensic Watermarking.
Analytics reports
Analytics reports on viewers for forensic watermarked videos are available via the Analytics API only. Reports can be returned in JSON, CSV, or XLXS format
In the Analytics data:
1 Transaction = 1 unique Viewer per video in 24 hoursExample 1: viewers for a video by date
For this example, we will query the video, viewer and date dimensions and get the report back in CSV format.
Sample request
https://analytics.api.brightcove.com/v1/data?accounts=4800266849001&from=2021-06-23&to=2021-06-25&dimensions=date,viewer&limit=10&where=video==70702952720202&fields=video,viewer,video_view&format=csvResponse
"date","video","viewer","video_view"
"2021-06-25","70702952720202","3f46037f932b0c5a","1"
"2021-06-24","70702952720202","3f46037f932b0c5a","2"
Note that the viewer is generated by the Brightcove player and set to a unique string based on user-agent and IP. Ideally you should set the viewer identifier yourself based on a sign-in id - see this topic for information on how to do that. Your identifier will be based on information that can be retrieved via JavaScript.
Example 2: viewer count
In this example, we will assume that all videos with forensic watermarking have the tag watermarked. We will again query the video, viewer and date dimensions and just return one item, as it is the summary we are interested in here:
Sample request
https://analytics.api.brightcove.com/v1/data?accounts=4800266849001&from=2021-06-23&to=2021-06-25&dimensions=date,viewer&limit=1&where=video.q==tags:watermarkedResponse
{
  "item_count": 7,
  "items": [
    {
      "date": "2021-06-25",
      "viewer": "07B1489C-5786-400E-945B-ABB3559B3897",
      "video_view": 1
    }
  ],
  "summary": {
    "video_view": 25
  }
}
APIs
Here are the APIs and fields related to Forensic Watermarking:
Dynamic Ingest API
Once an account is enabled for forensic watermarking, you can add forensic watermarking to a video by adding the forensic_watermarking field to your ingest request, and setting it to true. This can be done for the original ingestion, replacing, or retranscoding the video.
Sample request body
{
  "master": {
          "url": "https://solutions.brightcove.com/video/Walking_Dead_609.mp4",
          "audio_tracks": [
              {
                  "language": "en",
                  "variant": "main"
              }
          ]
      },
    "profile": "multi-platform-standard-static-with-mp4",
    "forensic_watermarking": true,
    "capture-images": true
}
There is also a forensic_watermarking_stub_mode flag which, when set to true produces visible forensic watermarks:
forensic_watermarking must also be set to true to enable visible watermarks.
Use visible watermarks on a video to test integrations (you should test with a video at least 10 minutes long). Once that you have verified that the forensic watermarks are present, you will want to remove them to have only invisible forensic watermarks. To do this, you will need to submit another Dynamic Ingest request to retranscode the video, this time setting forensic_watermarking_stub_mode to false.
Sample request body for visible forensic watermarks
{
  "master": {
          "url": "https://solutions.brightcove.com/video/Walking_Dead_609.mp4",
          "audio_tracks": [
              {
                  "language": "en",
                  "variant": "main"
              }
          ]
      },
    "profile": "multi-platform-standard-static-with-mp4",
    "forensic_watermarking": true,
    "forensic_watermarking_stub_mode": true,
    "capture-images": true
}
Sample request body to remove visible forensic watermarks
{
    "profile": "multi-platform-standard-static-with-mp4",
    "forensic_watermarking": true,
    "forensic_watermarking_stub_mode": false,
    "capture-images": true
}
CMS API
By default, forensic watermarked renditions will be delivered if forensic watermarking was requested during ingestion. The presence of forensic watermarks will be indicated by the read-only field forensic_watermarking. If the field has a value of ACTIVE, the forensic watermark was added to VOD. If the field has a value of UNAVAILABLE or null, the VOD doesn’t have the forensic watermark.
Zencoder
To generate outputs with forensic watermarking in Zencoder, you need to specify 2 outputs per video, one with "forensic_watermark": "A" and the other with "forensic_watermark": "B" (these are the only two values the forensic_watermark field can have).
Sample request (outputs only)
{
  "outputs": [
      {
          "base_url": "s3://urlTest",
          "filename": "contextAwareEncoding1_A.m4f",
          "public": false,
          "format": "m4f",
          "label": "m4f-contextAwareEncoding1-A-b30e1",
          "generate_mp4_atom_map": true,
          "Mp4_atom_map_filename": "contextAwareEncod-A-atom_map.json",
          "skip_audio": true,
          "forensic_watermark": "A",
          "dynamic_profile_rendition": 1,
          "skip": {
              "require_video": true
          },
          "fragment_duration": 2000,
          "segment_seconds": 2,
          "headers": {
              "x-amz-server-side-encryption": "AES256"
          }
      },
      {
          "base_url": "s3://urlTest",
          "filename": "contextAwareEncoding1_B.m4f",
          "public": false,
          "format": "m4f",
          "label": "m4f-contextAwareEncoding1-B-e348",
          "generate_mp4_atom_map": true,
          "mp4_atom_map_filename": "contextAwareEncod-B-atom_map.json",
          "skip_audio": true,
          "forensic_watermark": "B",
          "dynamic_profile_rendition": 1,
          "skip": {
              "require_video": true
          },
          "fragment_duration": 2000,
          "segment_seconds": 2,
          "headers": {
              "x-amz-server-side-encryption": "AES256"
          }
      }
  ]
}
Visible watermarks for testing
For testing purposes, to verify that forensic watermarking is present, you can force visible forensic watermarking by adding "forensic_watermark_stub_mode":true to outputs as shown in the sample below:
{
  "outputs": [
      {
          "base_url": "s3://urlTest",
          "filename": "contextAwareEncoding1_A.m4f",
          "public": false,
          "format": "m4f",
          "label": "m4f-contextAwareEncoding1-A-b30e1",
          "generate_mp4_atom_map": true,
          "Mp4_atom_map_filename": "contextAwareEncod-A-atom_map.json",
          "skip_audio": true,
          "forensic_watermark": "A",
          "forensic_watermark_stub_mode":true,
          "dynamic_profile_rendition": 1,
          "skip": {
              "require_video": true
          },
          "fragment_duration": 2000,
          "segment_seconds": 2,
          "headers": {
              "x-amz-server-side-encryption": "AES256"
          }
      },
      {
          "base_url": "s3://urlTest",
          "filename": "contextAwareEncoding1_B.m4f",
          "public": false,
          "format": "m4f",
          "label": "m4f-contextAwareEncoding1-B-e348",
          "generate_mp4_atom_map": true,
          "mp4_atom_map_filename": "contextAwareEncod-B-atom_map.json",
          "skip_audio": true,
          "forensic_watermark": "B",
          "forensic_watermark_stub_mode":true,
          "dynamic_profile_rendition": 1,
          "skip": {
              "require_video": true
          },
          "fragment_duration": 2000,
          "segment_seconds": 2,
          "headers": {
              "x-amz-server-side-encryption": "AES256"
          }
      }
  ]
}
Supported features
- HEVC
- Mixed Codec rendition ladders
- 5.1 Audio
- DRM
- Playback Restrictions
- Re-transcoding
- Source file replacement
- CAE
- Offline Download
- Chromecast
- Airplay
Limitations
- The segment length should be 2 seconds for it to work with Forensic Watermark. And the account should be specifically configured.
- Only VOD is supported at this time. Forensic watermarking for Live streams is not supported.
- Videos must be at least five minutes long to have forensic watermarking applied.
- Encrypted HLS videos (HLSe) are not currently supported.
- SSAI is not supported with Forensic Watermarking. If SSAI is used in a asset with Forensic Watermarking, the Forensic Watermarking will not be delivered.
- This feature requires a NAGRA License Key.
- Players will require a forensic watermarking JWT that you will create using a script provided by NAGRA.
- Delivery rules cannot be used with players used to deliver videos with forensic watermarking.
- You must use Brightcove's CDN. BYO CDN is not supported.
- Brightcove will not handle detection analysis. For this, contact NAGRA.
- Forensic Watermarking is not supported with License Keys Protection.
- You must set the dimensions between 320 and 5120 for width and 240 to 3200 for height.