XMLHttpRequest() and a proxy. Then later in the document a deeper dive will discuss example code. The first example uses the Analytics API to retrieve and display in the Brightcove player controlbar the number of views the video currently in the player has had. The second, and slightly more complex, example uses the Analytics API in conjunction with the Brightcove Player catalog to retrieve the most popular videos from an account and show them in a playlist. The code discussion in this document will center on retrieving the desired data from the correct REST API.High level view
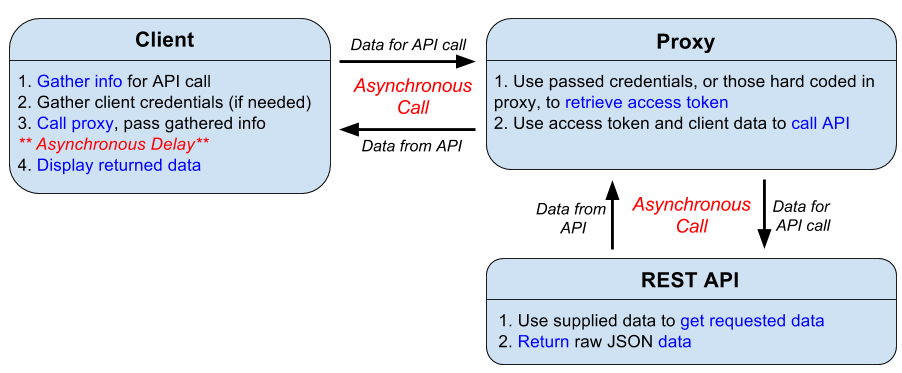
To use the REST APIs you need to have a few pieces in place. Briefly, they are:
- Client code: The client code asks for specific data then displays it according to application requirements. The client code will be discussed at some length in this document as it is what you will need to be writing most frequently.
- Proxy server: For security reasons the REST APIs will not accept data requests directly from the client as that would encourage sending confidential information, like client credentials, from the client. This means that a proxy will act as an intermediary between the client and the REST API. The proxy used in the examples is written in PHP and discussed later in this document. The proxy must be setup on a server under your control, and can be written in the language of your choice. The suggested configuration of the proxy enables it to be written once and used by any of the APIs.
- REST APIs: Brightcove supplies a comprehensive set of APIs to customize, extend, and integrate with the Brightcove platform. See the Overview: Video Cloud APIs document for more information.
The following diagram shows the interaction between the three core entities of the process to retrieve data from one of Brightcove's REST APIs:
Client functionality overview
The client side code changes significantly depending from which API you are requesting data. As mentioned above, the proxy is a write once and don't modify piece of code, and the APIs are maintained by Brightcove. This is why the emphasis in the document will be on learning how to alter the client code to retrieve the desired data from one of the APIs.
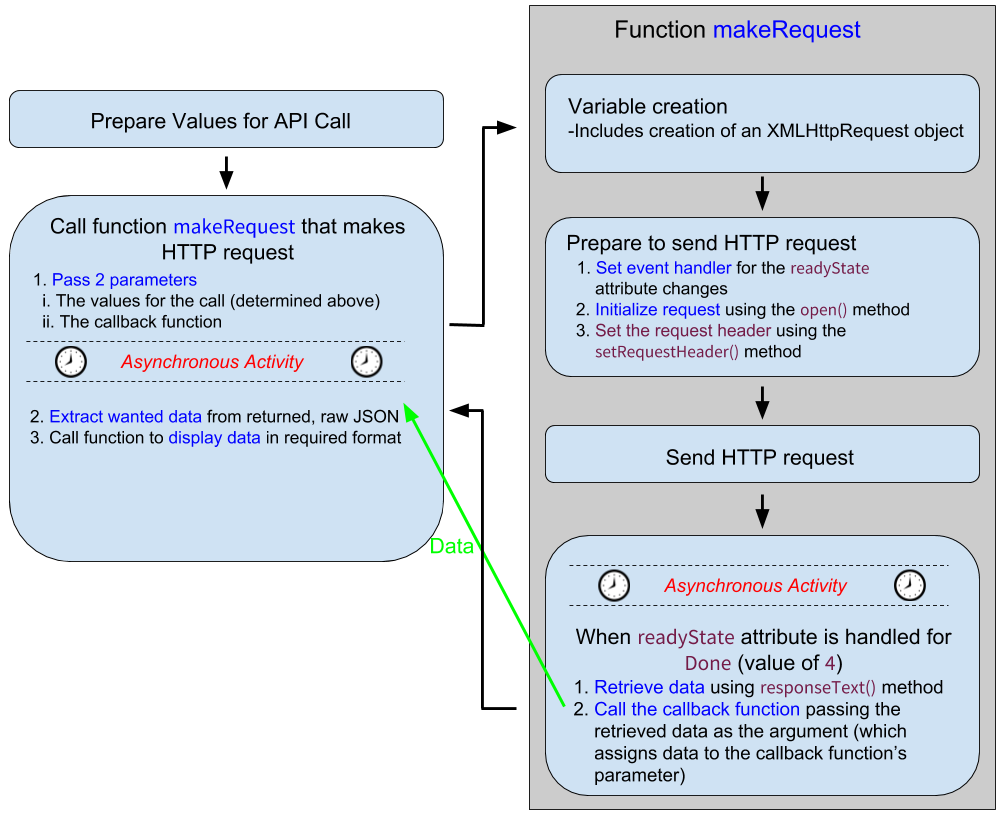
The diagram below focuses on key parts of the client code, those being:
- The function that makes the
HTTPRequestto the proxy. To avoid ambiguity the function is namedmakeRequest(). It is pictured on the right side of the diagram below. - The code that gathers required information for the request. It is pictured on the top-left of the diagram. This code is usually quite straight forward and uses concepts well known to even beginning programmers.
- The call that executes the previously mentioned
makeRequest()function. It is pictured on the bottom-left of the diagram. The call passes a function tomakeRequest()as a parameter. Then inmakeRequest()that function is called. This is an example of an anonymously defined callback function.
You see the two sections in the diagram labeled Asynchronous Activity. Although represented in the diagram in two different places, this is actually the same asynchronous activity, and represents the unknown time it takes for:
- The client to send the request to the proxy.
- The proxy to request data from the API.
- The API to build the result set and return it to the proxy.
- The proxy to return the data to the client.
Note that the logic flow arrows from the box that calls makeRequest() (bottom-left box) seem to indicate that the code is executed at two different times, which is exactly the case. The call to the function is made, but the callback function is not executed until makeRequest() has done its job and the callback function is executed, which returns the requested data to the function calling code.
Example code walkthrough
Rather than looking at the code as one piece, it will be presented and discussed in sections. Some of the sections will relate to the diagram above.
Standard player code
This code section contains the basic Brightcove Player in-page embed code.
- Lines 11-21: Standard Brightcove Player code with the addition of an
idattribute added.
<!doctype html>
<html>

<head>
  <meta charset="UTF-8">
  <title>Untitled Document</title>
</head>

<body>

<video-js id="myPlayerID"
  data-video-id="3851380732001"
  data-account="1752604059001"
  data-player="HkAzSmB0l"
  data-embed="default"
  data-application-id
  class="video-js"
  controls
  width="640"
  height="360"></video-js>
<script src="https://players.brightcove.net/1752604059001/HkAzSmB0l_default/index.min.js"></script>
Preparing to make call
This code section initializes variables and gets ready to make the call to makeRequest(). Generally speaking, for a read request you will need to provide the following information:
- The URL to the proxy you will be using, for example (of course, this needs to be proxy under your control):
https://solutions.brightcove.com/bcls/bcls-proxy/doc-samples-proxy-v2.php - The URL needed for the actual request, normally dynamically constructed:
https://analytics.api.brightcove.com/v1/alltime/accounts/1752604059001/videos/4825279519001 - The HTTP method, for instance
GET.
An example follows:
- Line 1: Standard code to wait until the player is ready to interact with.
- Lines 2-4: Create/set values for variables needed later in the code.
- Lines 7-12: Wait for the
loadstartevent so themediainfoobject is populated. Assign variables to hold values needed for the Analytics API endpoint. - Line 13: Set the HTTP method for the call.
videojs.getPlayer('myPlayerID').ready(function() {
  var myPlayer = this,
  accountId = myPlayer.bcinfo.accountId,
  options = {};

  // +++ Wait for loadstart event so can use mediainfo object +++
  myPlayer.on('loadstart', function() {
  var videoId = myPlayer.mediainfo.id,
  baseURL = 'https://analytics.api.brightcove.com/v1/alltime/accounts/',
  endPoint = accountId + '/videos/' + videoId;
  options.proxyURL = "https://solutions.brightcove.com/bcls/bcls-proxy/doc-samples-proxy-v2.php";
  options.url = baseURL + endPoint;
options.requestType = "GET";Call makeRequest()
This code section makes the call to makeRequest() function. Note that two parameters are passed. The first being the options object that holds info for the endpoint, and the second is the callback function. Remember, this is an asynchronous call so the anonymously defined callback function won't be called until data has been returned by the REST API to the makeRequest() function.
- Line 1: Call the
makeRequest()function, passing the required values for the call in theoptionsobject. In this case the object contains the following:
- Lines 3-13: The callback function is defined as an anonymous function (highlighted in yellow). Remember that this function is a parameter and NOT called here but later in the code.
- Lines 6, 8, 10:
console.log()statements that display:- The raw JSON string that is returned by the API call.
- The JSON object generated by the
JSON.parse()method that does conversion from string to object. - The actual views count, extracted from the object by using simple
object.propertynotation.
- Line 12: Calls the function that displays the number of views in the controlbar.
The following screenshot from the console shows actual displayed data from the console.log statements:

// +++ Make the request to the Analytics API +++
// Extract views from data returned by Analytics API
makeRequest(options, function(viewsRaw) {
  var viewsCount;
  // Remove console.log command for production code
  console.log('viewsRaw', viewsRaw);
  viewsObject = JSON.parse(viewsRaw);
  console.log('viewsObject', viewsObject);
  viewsCount = viewsObject.alltime_video_views;
  console.log('views', viewsCount);
  // Call function to place data in controlbar
  placeCountInControlbar(viewsCount);
});
Actual makeRequest() function
This section of the document examines the code that actually defines the makeRequest() function. The code that defines the function is written in such a way that it need NOT be modified, but used repeatedly as is. You may find edge cases that this is not true, but for the vast majority of uses this code need NOT be modified.
A line by line discussion of the code follows:
- Lines 1-6: Function definition and variables creation. A key point is that a new
XMLHttpRequestobject is created. - Lines 8, 26: Defines the event handler function for
readyStatechanges. - Lines 9, 23, 25: Use a
try-catchin case the request fails at a high level. - Lines 10, 11: Use
ifstatements to be sure the request is finished (readyStateis 4) and completed successfully, the status is in the 200 range. The following shows console logging of thereadyStateandstatusvalues in the event handler definition: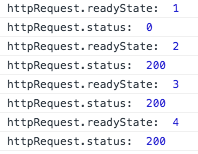
- Line 18: The callback function is executed. This passes the returned data from the API back to the callback function as detailed in the Call makeRequest() section above.
- Line 33: Set the event handler for the
XMLHttpRequest.onreadystatechangeevent. - Line 35: Initializes the request to the proxy.
- Line 38: Sends the request, which is asynchronous.
function makeRequest(options, callback) {
  var httpRequest = new XMLHttpRequest(),
  response,
  requestParams,
  dataString,
  proxyURL = options.proxyURL,
  // response handler
  getResponse = function() {
  try {
    if (httpRequest.readyState === 4) {
      if (httpRequest.status >= 200 && httpRequest.status < 300) {
        response = httpRequest.responseText;
        // some API requests return '{null}' for empty responses - breaks JSON.parse
        if (response === '{null}') {
          response = null;
        }
        // return the response
        callback(response);
      } else {
        alert('There was a problem with the request. Request returned ' + httpRequest.status);
      }
    }
  } catch (e) {
    alert('Caught Exception: ' + e);
  }
  };
  /**
  * set up request data
  * the proxy used here takes the following request body:
  * JSON.stringify(options)
  */
  // set response handler
  httpRequest.onreadystatechange = getResponse;
  // open the request
  httpRequest.open('POST', proxyURL);
  // set headers if there is a set header line, remove it
  // open and send request
  httpRequest.send(JSON.stringify(options));
}
Display the returned data
This code shows how to place the returned data into the controlbar. This function is called at the end of the callback function, shown in Call makeRequest() section above.
- Lines 5, 16: Define the function.
- Line 6: Create a variable for the
spacerelement in the controlbar. - Line 7: Dynamically create a
divelement. - Line 9: Place a label and the value of the views in the newly created
divelement. - Line 11: Use JavaScript's
document.getElementsByClassName()method to get the controlbar'sspacerelement. - Line 13: Style the
spacerto display the total views right-justified and down 10px from the top of thespacer. - Line 15: Add the newly created, populated and styled element to the
spacer.
/**
* Dynamically build a div that is then
* placed in the controlbar's spacer element
*/
function placeCountInControlbar(viewsCount) {
  var spacer,
  newElement = document.createElement('div');
  //Place data in div
  newElement.innerHTML = "Total Views: " + viewsCount;
  //Get the spacer in the controlbar
  spacer = document.getElementsByClassName('vjs-spacer')[0];
  //Right justify content in the spacer and add top margin
  spacer.setAttribute('style', 'justify-content: flex-end; margin-top: 10px');
  //Add the dynamically built div to the spacer in the controlbar
  spacer.appendChild(newElement);
}
Complete code listing
The complete, functioning code is located in this GitHub repository: display-views-in-controlbar.html.
Simple debugging
As you see, there are a number of pieces involved when using the REST APIs. This can present challenges when an app is not functioning correctly. Where do you start debugging?
A couple of simple suggestions are made in this section, and are a great place to start your debugging adventure. The following two sections give you a way to see the most basic information you need, what is being passed in to make the call, and what is returned.
Checking the call options
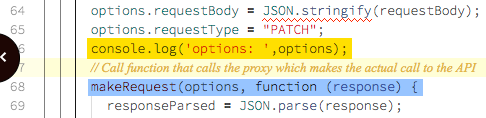
The client side code discussed in this document is basically all about providing the correct options to be used with the proxy, and in turn the actual API. So knowing the options are correct is essential to the correct functioning of your code. A simple way to do this is log to the console the options object just before they get passed into the makeRequest function where they are used:
What the options object contains will vary upon what you are trying to do, but some basics will always be there, those being:
- The account ID. This can be either a separate property, or part of the API endPoint URL.
- The URL to the proxy, which will be dependent upon where you store your proxy.
- The HTTP method type, for example
GET,POSTorPATCH. - The API endpoint URL used by the proxy to make the actual request from the API. For example:
https://players.api.brightcove.com/v2/accounts/57838016001/players
https://edge.api.brightcove.com/playback/v1/accounts/1752604059001/videos/5842800655001
https://analytics.api.brightcove.com/v1/alltime/accounts/1752604059001/videos/4093643993001
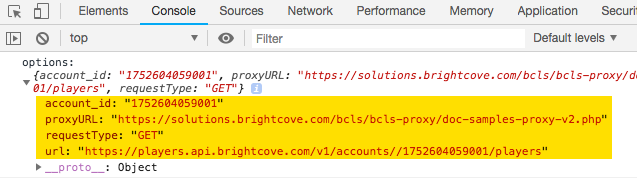
Other properties may be required in the options object depending on the API request. Here is an example of what you would see in the console when logging the options object for making a request for all the players in a specific account:
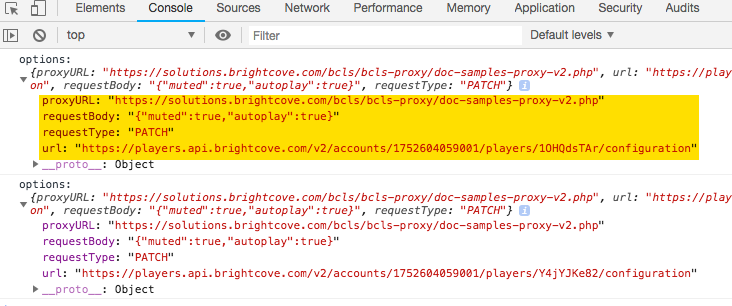
Here is a bit more complex logged options object used when updating players:
Viewing returned data
What is returned will vary upon what data you have requested, and if an error is returned. But no matter what is returned, you will most likely want to see what data is returned. A simple way to do this is log to the console the raw response data just after the call to the makeRequest function:

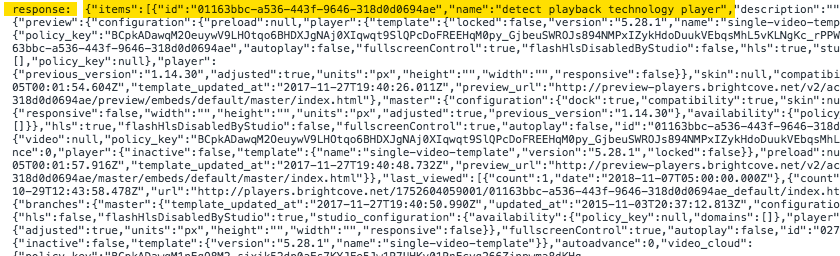
What will be returned has nearly infinite possibilities, but following are a few examples. The first shows the beginning of a response when asking for all the players in an account:
Here is the response after updating players, using the PATCH HTTP method:

Here is a more nicely formatted view of the data in the first response:
{
  "id": "1OHQdsTAr",
  "preview_url": "https://preview-players.brightcove.net/v2/accounts/.../master/index.html",
  "preview_embed_in_page": "https://preview-players.brightcove.net/v2/accounts/.../master/in_page.embed",
  "preview_embed_code": "<iframe src='//preview-players.brightcove.net/v2/accounts/.../master/index.html' ...></iframe>"
  }
And finally, here is a very valuable response from when an error occurred. In this case, an account was being used without proper credentials:

Other troubleshooting tips
If you are having problems, here are some other things to look for.
- Getting no response
- There are a couple of things to check if you are getting an empty response:
- Check the API reference to make sure the request returns a response. Some only return a 201 or 204 response with no content (especially, but not only, DELETE requests). You will need to adjust your code to handle this case.
- Check the Network section of the Developer Tools in your browser to make sure you see a successful call to the proxy (that server could be temporarily unavailable):
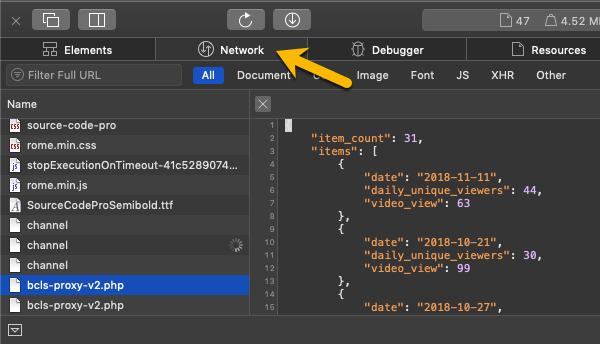
Developer Tools Network Section
- I see a response, but when I try to
JSON.parse()it, I get an exception. - Some possibilities here:
- See the previous item - trying to parse an empty sting will throw a JSON exception
-
Look at the response and make sure it is a JSON string (beginning with a
{or a[). There are a few cases where a request might not return JSON - an Analytics API call, for example, if you set theformatparameter tocsvorxlsx. Again, if you are making those kinds of requests, you will need to adjust your code to handle non-JSON responses. - In most cases, errors returned by the APIs are also in JSON format, but there are a few exceptions where the error is returned as plain text or HTML.
Proxy code
As mentioned earlier, the proxy can be written in the language of your choice. The Brightcove API documentation examples use a proxy written in PHP. Since the implementation of the proxy is so language dependent, the PHP code below will not be analyzed in detail in this document.
The basic functionality provided by a proxy must include:
- Accept client request.
- Get an auth token from the OAuth API.
- Send the auth token and data request (endpoint) to the intended API.
- Receive data back from API.
- Send data back to client.
<?php
/**
  * proxy for Brightcove RESTful APIs
  * gets an access token, makes the request, and returns the response
  * Accessing:
  *     (note you should **always** access the proxy via HTTPS)
  *     Method: POST
  *     request body (accessed via php://input) is a JSON object with the following properties
  *
  * {string} url - the URL for the API request
  * {string} [requestType=GET] - HTTP method for the request
  * {string} [requestBody] - JSON data to be sent with write requests
  * {string} [client_id] - OAuth2 client id with sufficient permissions for the request
  * {string} [client_secret] - OAuth2 client secret with sufficient permissions for the request
  *
  * Example:
  * {
  *    "url": "https://cms.api.brightcove.com/v1/accounts/57838016001/video",
  *    "requestType": "PATCH",
  *    "client_id": "0072bebf-0616-442c-84de-7215bb176061",
  *    "client_secret": "7M0vMete8vP_Dmb9oIRdUN1S5lrqTvgtVvdfsasd",
  *    "requestBody": "{\"description\":\"Updated video description\"}"
  * }
  *
  * if client_id and client_secret are not included in the request, default values will be used
  *
  * @returns {string} $response - JSON response received from the API
  */

// security checks
// if you want to do some basic security checks, such as checking the origin of the
// the request against some white list, this would be a good place to do it
// CORS enablement and other headers
header("Access-Control-Allow-Origin: *");
header("Content-type: application/json");
header("X-Content-Type-Options: nosniff");
header("X-XSS-Protection");

// default account values
// if you work on one Brightcove account, put in the values below
// if you do not provide defaults, the client id, and client secret must
// be sent in the request body for each request
$default_client_id     = 'YOUR_CLIENT_ID';
$default_client_secret = 'YOUR_CLIENT_SECRET';

// get request body
$requestData = json_decode(file_get_contents('php://input'));

// set up access token request
// check to see if client id and secret were passed with the request
// and if so, use them instead of defaults
if (isset($requestData->client_id)) {
    $client_id = $requestData->client_id;
}

if (isset($requestData->client_secret)) {
    $client_secret = $requestData->client_secret;
}

$auth_string = "{$client_id}:{$client_secret}";

// make the request to get an access token
$request = "https://oauth.brightcove.com/v4/access_token?grant_type=client_credentials";
$curl = curl_init($request);
curl_setopt($curl, CURLOPT_USERPWD, $auth_string);
curl_setopt($curl, CURLOPT_POST, TRUE);
curl_setopt($curl, CURLOPT_RETURNTRANSFER, TRUE);
curl_setopt($curl, CURLOPT_SSL_VERIFYPEER, FALSE);
curl_setopt($curl, CURLOPT_HTTPHEADER, array(
  'Content-type: application/x-www-form-urlencoded',
));

$response = curl_exec($curl);
$curl_info = curl_getinfo($curl);
$php_log = array(
  "php_error_info" => $curl_info
);
$curl_error = curl_error($curl);

curl_close($curl);

// Check for errors
// it's useful to log as much info as possible for debugging
if ($response === FALSE) {
  log_error($php_log, $curl_error);
}

// Decode the response and get access token
$responseData = json_decode($response, TRUE);
$access_token = $responseData["access_token"];
// get request type or default to GET
$method = "GET";
if ($requestData->requestType) {
    $method = $requestData->requestType;
}

// get the URL and authorization info from the form data
$request = $requestData->url;
// check for a request body sent with the request
if (isset($requestData->requestBody)) {
  $data = $requestData->requestBody;
}
  $curl = curl_init($request);
  curl_setopt($curl, CURLOPT_RETURNTRANSFER, TRUE);
  curl_setopt($curl, CURLOPT_SSL_VERIFYPEER, FALSE);
  curl_setopt($curl, CURLOPT_HTTPHEADER, array(
    'Content-type: application/json',
    "Authorization: Bearer {$access_token}"
  ));
  switch ($method)
    {
      case "POST":
        curl_setopt($curl, CURLOPT_POST, TRUE);
        if ($requestData->requestBody) {
          curl_setopt($curl, CURLOPT_POSTFIELDS, $data);
        }
        break;
      case "PUT":
        // don't use CURLOPT_PUT; it is not reliable
        curl_setopt($curl, CURLOPT_CUSTOMREQUEST, $method);
        if ($requestData->requestBody) {
          curl_setopt($curl, CURLOPT_POSTFIELDS, $data);
        }
        break;
      case "PATCH":
        curl_setopt($curl, CURLOPT_CUSTOMREQUEST, $method);
        if ($requestData->requestBody) {
          curl_setopt($curl, CURLOPT_POSTFIELDS, $data);
        }
        break;
      case "DELETE":
        curl_setopt($curl, CURLOPT_CUSTOMREQUEST, $method);
        if ($requestData->requestBody) {
          curl_setopt($curl, CURLOPT_POSTFIELDS, $data);
        }
        break;
      default:
        // GET request, nothing to do;
    }
  $response = curl_exec($curl);
  $curl_info = curl_getinfo($curl);
  $php_log = array(
    "php_error_info" => $curl_info
  );
  $curl_error = curl_error($curl);
  curl_close($curl);

// Check for errors and log them if any
// note that logging will fail unless
// the file log.txt exists in the same
// directory as the proxy and is writable

if ($response === FALSE) {
  log_error($php_log, $curl_error);
}

function log_error($php_log, $curl_error) {
  $logEntry = "\nError:\n". "\n".date("Y-m-d H:i:s"). " UTC \n" .$curl_error. "\n".json_encode($php_log, JSON_PRETTY_PRINT);
  $logFileLocation = "log.txt";
  $fileHandle      = fopen($logFileLocation, 'a') or die("-1");
  fwrite($fileHandle, $logEntry);
  fclose($fileHandle);
  echo "Error: there was a problem with your API call"+
  die(json_encode($php_log, JSON_PRETTY_PRINT));
}

// return the response to the AJAX caller
echo $response;
?>
Although the entire code for the proxy server is shown above, it is also located in the GitHub repository: sample-proxy-apps in the php folder.
Example 2
This second example is more complex than the one detailed earlier. This example displays the 10 most popular videos from an account in a playlist. The main steps of the code are:
- Request from the Analytics API the 10 videos with the most views in an account. This step involves an asynchronous call using a callback function.
- From the returned Analytics API data, extract only the video IDs and place them in an array. A helper function is written to do the extraction of IDs from the returned data.
- Request the complete video objects for each of the videos in the list of IDs in the array. This step involves looping over the array and requesting the video objects using
player.catalog.getVideo(). Of course, this involves multiple asynchronous calls using thecatalog. A helper function is written to retrieve the video objects based on IDs and place the objects into an array. - Place the array of video objects into the playlist for a playlist-enabled player.
Since you are now familiar with many of the concepts and specific code on how to call the APIs, only the code that calls the makeRequest() function is detailed.
- Line 2: Call the
makeRequest()function passing as arguments the options required for a successful REST API call, along with an anonymously defined callback function (highlighted in yellow). This should sound familiar from above. Very importantly, themakeRequest()function that is called IS THE EXACT SAME FUNCTION USED IN THE PREVIOUS EXAMPLE. You can do the same in your code. ThemakeRequest()function was written to be reused with any calls to a Brightcove REST API. - Line 3: Create a variable to hold the JSON parsed returned data.
- Line 5: Parse the returned data to convert if from a string to an object.
- Line 7: Use the helper function to extract video IDs from returned data. Unfortunately, the Analytics API does not return the full video objects, so IDs are needed to access the full objects.
- Lines 9-12: Call the
getVideoDatahelper function that uses a callback function to populate thevideoObjectsarray based on IDs passed. - Line 11: Populate the playlist with the array of video objects.
// +++ Make the CMS API request to get matching video IDs +++
makeRequest(options, function(mostWatchedVideos) {
  var JSONmostWatchedVideos;
  // Convert response string into JSON
  JSONmostWatchedVideos = JSON.parse(mostWatchedVideos);
  // Extract the needed video IDs into an array
  videoData = extractVideoData(JSONmostWatchedVideos);
  // Get video objects based on array of video IDs
  getVideoData(videoData, function(videoObjects) {
    // Add the most watched videos list to the player as a playlist
    myPlayer.playlist(videoObjects);
  });
});
Complete code listing
The complete, functioning example is located in this CodePen: Most Watched Videos in a Playlist.