What you need
To complete this tutorial, you need the following.
- A Video Cloud account.
- Client credentials with access to the new NextGen Live APIs and CMS APIs.
- The ability to make REST API requests either via cURL or a REST client Postman.
- To create an actual live stream, you will need either a software or hardware encoder for live streaming. The instructions below will include steps for setting up the live stream using Wirecast (sign up for a trial). If you are using a different encoder, the process will be different but should be similar in terms of the information you need from the Live API response.
- For detailed information about the API endpoints, payloads, and usage guidelines, refer to the NextGen Live API Reference.
Obtain credentials
The easiest way to get credentials in most cases is through the Studio Admin API Authentication section (requires admin permissions on your account). See Managing API Authentication Credentials for details. This is the recommended way of obtaining your client credentials. In most cases, you will likely want to get all permissions:
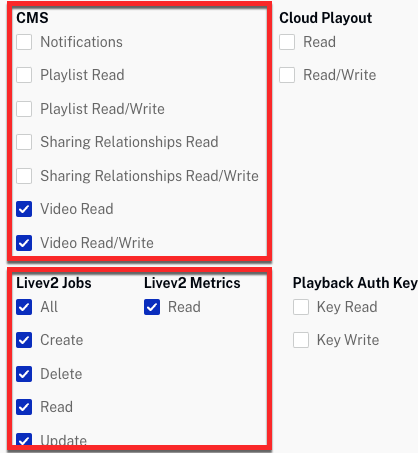
If the permissions you need are not available in Studio, or if you prefer to get them directly from the OAuth API, use your choice of the Get Client Credentials documents listed below. Whichever option you choose, you will need to ask for the correct operation permissions. The following can be used with cURL or Postman to get the proper permissions:
"operations": [
    "video-cloud/videos/read",
    "video-cloud/videos/create",
    "video-cloud/videos/update",
	"video-cloud/livev2/jobs/read",
	"video-cloud/livev2/jobs/create",
	"video-cloud/livev2/jobs/update",
	"video-cloud/livev2/jobs/delete",
	"video-cloud/livev2/jobs/all",
	"video-cloud/livev2/metrics/read"
]Configure a new job
First we will configure a new job using Postman. See the API Reference for more details.
- For this step, you will submit a
POSTrequest to:https://api.live.brightcove.com/v2/accounts/{{account_id}}/jobsReplace {{account_id}} with your Brightcove account ID.
Use the following as the request body:
Sample Request Body
{
   "name": "BCLS Job",
   "description": "Blive Job",
   "long_description": "Blive Job long description",
   "playback_rights_id": "",
   "tags": [
     "sports"
   ],
   "input": {
     "protocol": "rtmp",
     "whitelist_cidr_blocks": ["0.0.0.0/0"],
     "fixed_ingest_ip": false
   },
   "type": "event",
   "live_to_vod": false,
   "outputs": {
     "video": [
   	{
   	  "label": "1080p",
   	  "height": 1080,
   	  "width": 1920,
	  "framerate": "30/1",
   	  "bitrate": 6000000,
   	  "codec": "h264",
   	  "codec_options": {
   		"profile": "high",
   		"level": "4.2"
   	  },
   	  "keyframe_rate": 0,
   	  "sample_aspect_ratio": "1:1",
   	  "decoder_buffer_size":9000000,
   	  "max_bitrate":7200000
   	},
   	{
   	  "label": "720p",
   	  "height": 720,
   	  "width": 1280,
	  "framerate": "30/1",
   	  "bitrate": 4000000,
   	  "codec": "h264",
   	  "codec_options": {
   		"level": "4",
   		"profile": "main"
   	  }
   	},
   	{
   	  "label": "480p",
   	  "height": 480,
   	  "width": 640,
	  "framerate": "30/1",
   	  "bitrate": 2000000,
   	  "codec": "h264",
   	  "codec_options": {
   		"profile": "main"
   	  }
   	}
     ],
     "audio": [
   	{
   	  "label": "aac1",
   	  "input_selector_name": "default",
   	  "language_code": "eng",
   	  "codec": "aac",
   	  "bitrate": 128000,
   	  "sample_rate": 44100
   	}
     ]
   },
   "manifest": {
     "name": "playlist",
     "segment_duration_seconds": 6,
     "playlist_window_seconds": 60,
     "segment_container_format": "cmaf",
     "hls": {
   	"startover_window_seconds": 300
     },
     "dvr": {
   	"playlist_window_seconds": 300
     },
     "dash": {
   	"startover_window_seconds": 300
     },
     "low_latency": {},
     "playlist_groups": [
   		  {
   			  "name": "playlist-fullhd",
   			  "video_height": {
   				  "min": 721,
   				  "max": 1080
   			  }
   		  },
   		  {
   			  "name": "playlist-hd",
   			  "video_height": {
   				  "min": 1,
   				  "max": 720
   			  }
   		  }
   	  ]
   },
   "region": "us-east-1",
   "maintenance_preferences": {
     "day": "MONDAY"
   }
 }
In the Authorization tab, set the type to OAuth 2.0, then fill in the following fields:
Grant Type: Client Credentials.
Access Token URL:
https://oauth.brightcove.com/v4/access_tokenClient ID and Client Secret: Your Brightcove credentials.
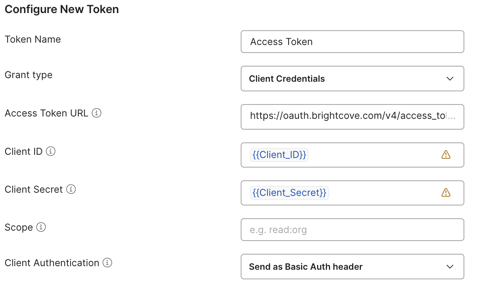
Click Get New Access Token to generate the token, select the token as Access Token, and then click Use Token to apply it to your request.
- The response from the API should look similar to this:
Sample response
		{
	    "id": "1816266131926533508",
 	"account_id": "1752604059001",
 	"state": {
		    "processing_state": "configuring"
 	},
 	"created_at": "2024-11-20T18:12:41Z",
 	"input": {
 		"protocol": "rtmp",
 		"whitelist_cidr_blocks": [
 			"0.0.0.0/0"
 		],
 		"fixed_ingest_ip": false
 	},
 	"outputs": {
 		"video": [
 			{
 				"label": "1080p",
 				"height": 1080,
 				"width": 1920,
				"framerate": "30/1",
 				"bitrate": 6000000,
 				"codec": "h264",
 				"codec_options": {
 					"level": "4.2",
 					"profile": "high"
 				},
 				"sample_aspect_ratio": "1:1",
 				"decoder_buffer_size": 9000000,
 				"max_bitrate": 7200000
 			},
 			{
 				"label": "720p",
 				"height": 720,
 				"width": 1280,
				"framerate": "30/1",
 				"bitrate": 4000000,
 				"codec": "h264",
 				"codec_options": {
 					"level": "4",
 					"profile": "main"
 				},
 				"decoder_buffer_size": 6000000,
 				"max_bitrate": 4800000
 			},
 			{
 				"label": "480p",
 				"height": 480,
 				"width": 640,
				"framerate": "30/1",
 				"bitrate": 2000000,
 				"codec": "h264",
 				"codec_options": {
 					"profile": "main"
 				}
 			}
 		],
 		"audio": [
 			{
 				"label": "aac1",
 				"input_selector_name": "default",
 				"language_code": "eng",
 				"codec": "aac",
 				"bitrate": 128000,
 				"sample_rate": 44100
 			}
 		]
 	},
 	"manifest": {
 		"name": "playlist",
 		"segment_duration_seconds": 6,
 		"playlist_window_seconds": 60,
 		"hls": {
 			"startover_window_seconds": 300
 		},
 		"dash": {},
 		"dvr": {
 			"playlist_window_seconds": 300
 		},
 		"low_latency": {},
 		"playlist_groups": [
 			{
 				"name": "playlist-fullhd",
 				"video_height": {
 					"min": 721,
 					"max": 1080
 				}
 			},
 			{
 				"name": "playlist-hd",
 				"video_height": {
 					"min": 1,
 					"max": 720
 				}
 			}
 		],
 		"segment_container_format": "cmaf"
 	},
 	"region": "us-east-1",
 	"maintenance_preferences": {
 		"day": "MONDAY"
 	},
 	"type": "event",
 	"name": "BCLS Job",
 	"description": "Blive Job",
 	"long_description": "Blive Job long description",
 	"playback_rights_id": "primary",
 	"tags": [
 		"sports"
 	]
 }
Start a Job
Now that we have retrieved the Job ID from the previous step, along with its current status, we can use this Job ID to start the job.
- For this step, you will submit a
PUTrequest to:https://api.live.brightcove.com/v2/accounts/{{account_id}}/jobs/{{job_id}}/startReplace {{account_id}} with your Brightcove account ID and the {{job_id}} with the Job ID retrieved in the previous step.
- Ensure you have a valid OAuth 2.0 Bearer Token. If the token has expired, refresh it.
- When the request is successful, you will receive a response with a status code of
200 OK. The response body will confirm the job has started and provide the job's unique identifier, like this:{ "id": "1816266131926533508" }
Obtaining the Ingest Endpoints
Now that the job has started, we can use the endpoint below to query job details and retrieve the ingest endpoint, which is required to configure your encoder. While the example below assumes an RTMP job, the process for obtaining the ingest endpoint remains the same for other supported protocols, such as RTP or SRT.
- For this step, you will submit a
GETrequest to:https://api.live.brightcove.com/v2/accounts/{{account_id}}/jobs/{{job_id}}Replace {{account_id}} with your Brightcove account ID and the {{job_id}} with the Job ID.
- Ensure you have a valid OAuth 2.0 Bearer Token. If the token has expired, refresh it.
A successful response will return a status code of
200 OK, along with a JSON payload containing the job details. Look for theingest_endpointsfield, which provides the RTMP URL to configure your encoder.Sample Response
{ "id": "1816266131926533508", "account_id": "17526048509001", "state": { "processing_state": "on", "ingest_state": "waiting" }, "ingest_endpoints": [ { "url": "rtmp://1816266131926533508.ingest.live.brightcove.com:1935/1816266131926533508/blive" } ], "created_at": "2024-11-20T18:12:41Z", "input": { "protocol": "rtmp", "whitelist_cidr_blocks": ["0.0.0.0/0"] }, ... }
Generate a Playback Token
Now we have to generate a playback token, which will be necessary to retrieve the playback URL for the live stream.
- For this step, you will submit a
POSTrequest to:https://api.live.brightcove.com/v2/accounts/{{account_id}}/playback/{{job_id}}/tokenReplace {{account_id}} with your Brightcove account ID and the {{job_id}} with the Job ID.
- Ensure you have a valid OAuth 2.0 Bearer Token. If the token has expired, refresh it.
- In the request body, you can specify parameters to customize the token generation.
Sample request body:
{ "dvr": false, //enables playlist with dvr "manifest_format": "hls", //specifies playlist output type "playlist_name": "playlist", //sets a custom playlist name "low_latency": false //requests a low latency playlist } - A successful response will return a status code of
200 OK, along with the generated playback token.Example response:
{ "token": "eyJhbGciOiJIUzI1NiIsInR5cCI6IkpXVCJ9..." }
Generate Playback URL
After generating the playback token in the previous step, the next step is to use this token to generate the playback URL.
- For this step, you will submit a
GETrequest to:https://api.live.brightcove.com/v2/playback/{{job_id}}?pt={{Job_Token}}Replace {{job_id}} with the Job ID and the {{Job_Token}} with the playback token generated in the previous step.
- Ensure you have a valid OAuth 2.0 Bearer Token. If the token has expired, refresh it.
- A successful response will return an HTTP status code of
200 OKand a JSON payload containing the playback URL.Example response:
{ "url": "https://blive.akamaized.net/1816266131926533508/us-east-1/17526048509001/eyJhbGciOiJIUzI..." }
Add video to a player
Now we will create a simple HTML page and add a player to it with the video we just created.
- Create a simple HTML page to test the live stream player. You can include any other content you like, or none at all.
- In the Studio Media Module, select the video created for this job and click Publish and Embed > Publish to web:
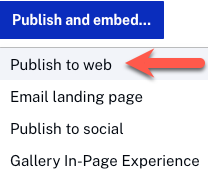
Publish Video - In the Publish dialog, select a player (the Brightcove Default Player is fine):

Select Player - Scroll down, set the size the player as you wish, and then click in code block to select the Advanced player code - copy this code and paste into the body of your html page:
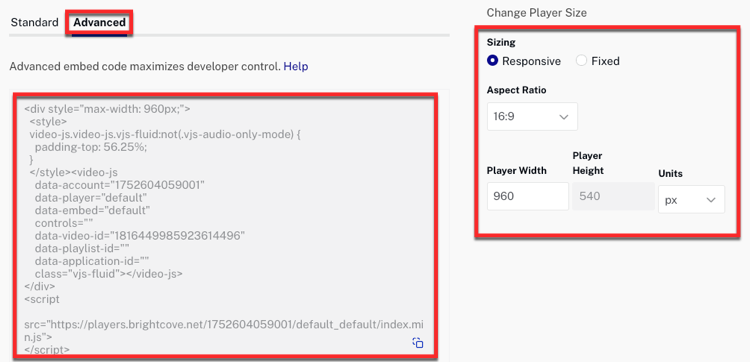
Get Publishing Code - Save your html page to a remote or local web server so that you can browse it.
- Open the page in your web browser. If streaming is in progress we should get playback else we might see a media error:
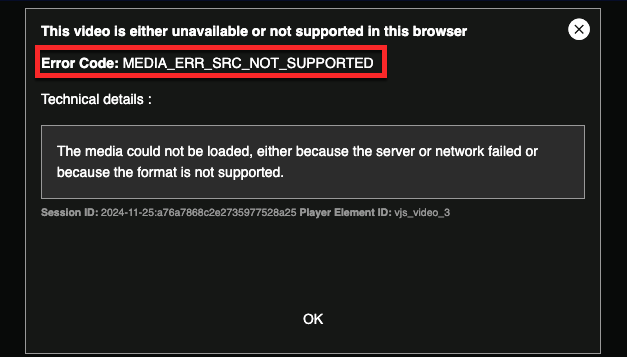
Media Error
Use Wirecast to stream an event
In this section, we will configure and use the Telestream Wirecast encoder to support a live streaming event. Telestream Wirecast software is a desktop application that captures input from your camera and produces a stream that can be delivered by a CDN. Note that there are hardware and other software based encoding solutions available that may be better suited for delivering your live streaming event. You can download a trial version of the Wirecast software from the Telestream website.
Note: You should have the Wirecast software installed and a camera connected to your computer before proceeding.
To configure Wirecast for a live event, follow these steps.
- Open Wirecast.
- Hover over the +, click Capture Devices and then select your camera.
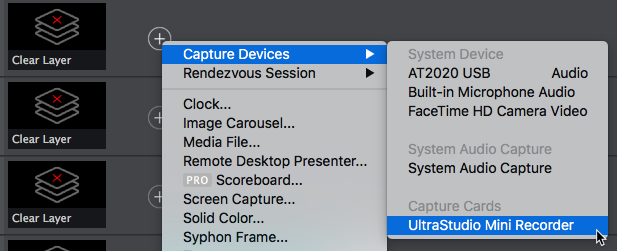
Selecting a camera - Click the arrow button (
 ) to make the camera shot the live shot.

Wirecast camera configuration - Click the Stream button (
 ). You will be prompted to configure the output settings.
 - Set the Destination to RTMP Server. Click OK.
- For the Address, use the stream_url returned from the Live API.
- For the Stream, use blive.
- (Optional) To create additional output streams, click Add... When creating additional output streams, you may wish to create your own custom encoding profile to control the output bitrate. Make sure that the Stream name reflects the new bitrate.
- Click OK to save the output settings.
- Click the Stream button ( ). The live stream should begin.
Stop a Job
Once the live broadcast is no longer needed, you can use this endpoint to stop the live job.
- For this step, you will submit a
PUTrequest to:https://api.live.brightcove.com/v2/accounts/{{account_id}}/jobs/{{job_id}}/stopReplace {{account_id}} with your Brightcove account ID and the {{job_id}} with the Job ID retrieved in the previous step.
- Ensure you have a valid OAuth 2.0 Bearer Token. If the token has expired, refresh it.
- When the request is successful, you will receive a response with a status code of
200 OK. The response body will include the job ID, and the stop operation will be initiated and completed asynchronously. Use the GET Job endpoint or subscribe to notifications to confirm when the job transitions to the OFF state.sample response:
{
 	"id": "1816266131926533508"
 }