This topic will assist you in deciding when and how to use the Embed APIs. The decision of choosing between using the Player Configuration APIs versus the Embed APIs is an important one and the content in this document will guide you in these decisions.
Why use the embed APIs?
The embed APIs allow you to create multiple instances of a particular player. A good way to think of this player/instance relationship is as a parent/child relationship. The single player is the parent, and players created with the embed APIs are children of the parent player. The parent player has the bulk of the properties you wish your player to have, and then you can use the embed APIs to customize subsets of properties on different child players. For example, you can load different media or use different plugins and styling with different child players.
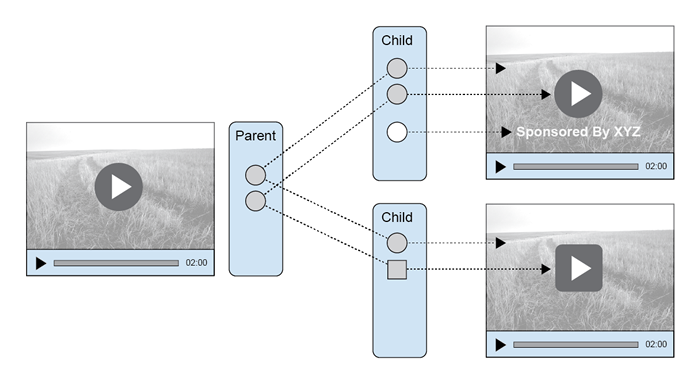
The following diagrams help clarify the functionality. Below the parent is shown on the left, and two child players on the right. Observe that:
- The poster is inherited by both children
- The shape of the play button is inherited by the top child, while it is overridden in the bottom child
- The top child adds a property, in this case an overlay, which the parent does not have
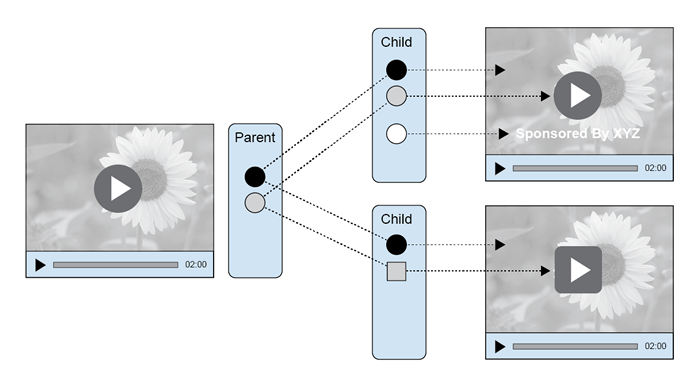
Another powerful feature of this parent/child relationship is that the inheritance is ongoing. The following diagram shows a new poster assigned to the parent, and both children will inherit that configuration change.
When NOT to use the embed APIs
While there are some good reasons to use the embed APIs if your use case needs it, there's also some good reasons to stick with regular players. Here are a few:
- Child players can not be edited using Video Cloud Studio. You can only edit child players through the Player Management API. You can edit the parent player of a child player in Video Cloud Studio, however, a change made to the parent player affects all child players.
- Publishing a parent player can take a long time if you have a lot of child players associated with that parent player. Each child player is published separately, and if you have more than 30 child players, you can expect some delays in your child player publishing. This would be exactly the same case as publishing 30 regular players at the same time.
Given the reasons above, it may make sense to start with using regular players, and then trying out embeds when you see the need for child players.
video tag data-embed
There is a notational differences in parent and child players. Standard in-page embed player code appears in this format:
    <video-js
      data-account="1507807800001"
      data-player="HiAdwRZ7kK"
      data-embed="default"
      controls=""
      data-application-id=""
      class="vjs-fluid"></video-js>
The data-embed attribute determines if the player is a parent or child. If the value is default, the player is a parent. If the player is a child, the data-embed attribute will contain the ID of the parent player. An example of that follows:
The data-embed attribute determines if the player is a parent or child. If the value is default, the player is a parent. If the player is a child, the data-embed attribute will contain the ID of the parent player. An example of that follows:
    <video-js
      data-account="1507807800001"
      data-player="HiAdwRZ7kK"
      data-embed="NURK56ZSV"
      data-application-id=""
      class="video-js" controls></video-js>
Note that the data-player, that is the player ID, is the same, but the data-embed has changed from default to the child player's ID.
Child player URLs
How do you differentiate between the parent player and child players? The URLs will be different. For example, a parent player's URL is:
//players.brightcove.net/1507807800001/HiAdwRZ7kK_default/index.min.js
After using the embed APIs to create a child player, the child player's ID added to the parent's URL, as shown here:
//players.brightcove.net/1507807800001/HiAdwRZ7kK_NURK56ZSV/index.min.js
Parent/child use case
Assume you use multiple video players. Often, the common features of the players are very nearly the same, but in a few instances you want to tweak the player for special cases. You could create multiple players using the Player Configuration APIs with POST and PATCH methods, but this could lead to significant maintenance issues. For instance, say you wanted to change the poster for all the players. This would mean using PATCH on all the different players. Whereas if you created child players, you would only PATCH the parent player, and all the child players would automatically have the new poster.
Creation process
If you have done the Step-by-Step: Player Management you have seen the process of using curl statements to communicate HTTP methods to the Player Management API. The same approach will be used here.
To create a player you have most likely used a few HTTP methods with the Player Configuration APIs, such as:
- Create the player using a
POSTto https://players.api.brightcove.com/v2/accounts//players - Update the player using a
PATCHto https://players.api.brightcove.com/v2/accounts//players//configuration - Publish the updated player using a
POSTto https://players.api.brightcove.com/v2/accounts//players//publish
A similar approach will be used for child players using the embed APIs. At a very high level you will:
- Create a child player using a
POSTto https://players.api.brightcove.com/v2/accounts//players//embeds. Note: Child players created with the embed APIs self publish on creation so there is no need to publish on child player creation, only on child player update. - Update the child player using a
PATCHto https://players.api.brightcove.com/v2/accounts//players//embeds/$EMBED_ID/configuration - Publish the child player using a
POSTto https://players.api.brightcove.com/v2/accounts//players//embeds/$EMBED_ID/publish
The following content describes the process in detail.
Create child player
To create a child player you use an HTTP POST method, as shown here:
    curl /
    --header "Content-Type: application/json" /
    --header "Authorization: Bearer $ACCESS_TOKEN" /
    --request POST /
    --data '{
    "media": {
    "sources": [
      {
        "src":"https://solutions.brightcove.com/bcls/assets/videos/BirdsOfAFeather.mp4",
        "type":"video/mp4"
      }
    ],
    "poster": {
      "highres":"https://solutions.brightcove.com/bcls/assets/images/BirdsOfAFeather.jpg"
    }
    }
      }' /
    https://players.api.brightcove.com/v2/accounts/{{account_id}}/players/$PLAYER_ID/embeds
An example response to the child player creation is as follows:
    {
        "id": "be864624-8d85-4dfc-8fe6-4e9dd4c70417",
        "url": "https://players.brightcove.net/1507807800001/668c5107-a80c-4940-8c17-279c01ce101c_be864624-8d85-4dfc-8fe6-4e9dd4c70417/index.html",
        "embed_code": "<iframe src='//players.brightcove.net/1507807800001/668c5107-a80c-4940-8c17-279c01ce101c_be864624-8d85-4dfc-8fe6-4e9dd4c70417/index.html' allowfullscreen webkitallowfullscreen mozallowfullscreen></iframe>",
        "embed_in_page": "https://players.brightcove.net/1507807800001/668c5107-a80c-4940-8c17-279c01ce101c_be864624-8d85-4dfc-8fe6-4e9dd4c70417/in_page.embed",
        "preview_url": "https://preview-players.brightcove.net/1507807800001/668c5107-a80c-4940-8c17-279c01ce101c/be864624-8d85-4dfc-8fe6-4e9dd4c70417/index.html",
        "preview_embed_code": "<iframe src='//preview-players.brightcove.net/1507807800001/668c5107-a80c-4940-8c17-279c01ce101c/be864624-8d85-4dfc-8fe6-4e9dd4c70417/index.html' allowfullscreen webkitallowfullscreen mozallowfullscreen></iframe>"
    }
Note: The child player self publishes on creation, so there is no need to publish the child player after creation. You still must publish child player if it is altered with a PATCH method. At this point the preview information is not helpful as you can use the published child player immediately upon creation.
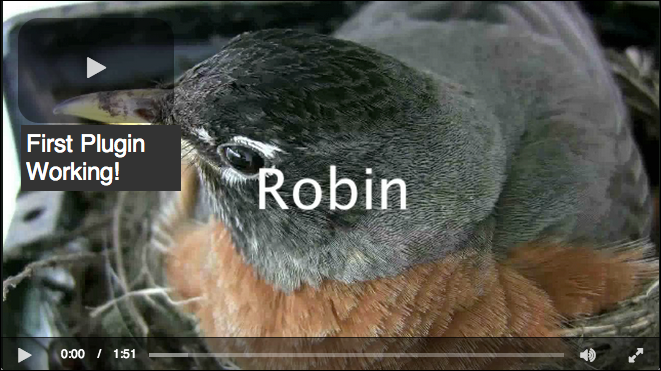
You can now use the url property from the child player to see the results. In the example below the child player was added to the parent player created in the Step-by-Step: Player Management. You see the new poster and video, but the overlay plugin from the parent player is still present.
Update child player
To update the child player you use an HTTP PATCH method. The following curl statement updates the poster property. It is assumed you have set the $EMBED_ID environment variable appropriately:
    curl
    --header "Content-Type: application/json"
    --header "Authorization: Bearer $ACCESS_TOKEN"
    --request PATCH
    --data '{
    "media": {
    "poster": {
      "highres":"https://solutions.brightcove.com/bcls/assets/images/Water-Splashing.jpg"
    }
    }
      }'
    https://players.api.brightcove.com/v2/accounts/{{account_id}}/players/$PLAYER_ID/embeds/$EMBED_ID/configuration
The response provides preview information for both a preview_url and preview_embed_code code:
    {
        "preview_url": "https://preview-players.brightcove.net/1507807800001/668c5107-a80c-4940-8c17-279c01ce101c/be864624-8d85-4dfc-8fe6-4e9dd4c70417/index.html",
        "preview_embed_code": "<iframe src='//preview-players.brightcove.net/1507807800001/668c5107-a80c-4940-8c17-279c01ce101c/be864624-8d85-4dfc-8fe6-4e9dd4c70417/index.html' allowfullscreen webkitallowfullscreen mozallowfullscreen></iframe>"
    }
Publish child player
Once the child player is altered you will need to publish it. Be sure the $EMBED_ID environment variable is set and you can then publish the newly altered child player:
    curl
    --header "Content-Type: application/json"
    --header "Authorization: Bearer $ACCESS_TOKEN"
    --request POST
    https://players.api.brightcove.com/v2/accounts/{{account_id}}/players/$PLAYER_ID/embeds/$EMBED_ID/publish
The response provides the vital information needed to use the child player, very much like publishing a player does:
    {
        "id": "be864624-8d85-4dfc-8fe6-4e9dd4c70417",
        "url": "https://players.brightcove.net/1507807800001/668c5107-a80c-4940-8c17-279c01ce101c_be864624-8d85-4dfc-8fe6-4e9dd4c70417/index.html",
        "embed_code": "<iframe src='//players.brightcove.net/1507807800001/668c5107-a80c-4940-8c17-279c01ce101c_be864624-8d85-4dfc-8fe6-4e9dd4c70417/index.html' allowfullscreen webkitallowfullscreen mozallowfullscreen></iframe>",
        "embed_in_page": "https://players.brightcove.net/1507807800001/668c5107-a80c-4940-8c17-279c01ce101c_be864624-8d85-4dfc-8fe6-4e9dd4c70417/in_page.embed"
    }
Display child info
You can use the HTTP GET method to retrieve the information about a child player. An example curl statement is:
    curl
      --header "Content-Type: application/json"
      --header "Authorization: Bearer $ACCESS_TOKEN"
      --request GET
      https://players.api.brightcove.com/v2/accounts/{{account_id}}/players/$PLAYER_ID/embeds
A fairly large amount of JSON data is returned.
Delete child players
You can also delete a child player by using the DELETE method. Here is an example curl statement to delete a child player:
    curl
    --header "Content-Type: application/json"
    --header "Authorization: Bearer $ACCESS_TOKEN"
    --request DELETE
    https://players.api.brightcove.com/v2/accounts/{{account_id}}/players/$PLAYER_ID/embeds/$EMBED_ID
Of course, this will affect only the child player and not the parent player.