What you need
To complete this tutorial, you need the following.
- An account set up for the Live API
- An api key for the Live API (provided to you when the account is set up)
- A Video Cloud account (not required to create the live stream job, but needed to set up playback in the Brightcove Player)
- If you will be using the CMS API to create the Video Cloud video rather than Studio, you will need client credentials with video/read and video/write permissions - if you are not familiar with the process of getting client credentials, see the authentication section below.
- The ability to make REST API requests either via cURL or a REST client such as Insomnia or Postman.
To help you, we've prepared some Insomnia and Postman imports you can use for the exercise (at Brightcove Learning Services, we prefer and use Insomnia, but Postman will also work if that is what you have):
In each of the zip files, you will find a readme page to help you along.
- To create an actual live stream, you will need either a software or hardware encoder for live streaming. The instructions below will include steps for setting up the live stream using Wirecast ( sign up for a trial). If you are using a different encoder, the process will be different but should be similar in terms of the information you need from the Live API response.
Get credentials for the CMS API
To use the CMS API you will need proper credentials.
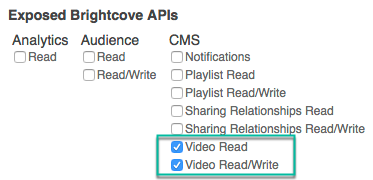
The easiest way to get credentials in most cases is through the Studio Admin API Authentication section (requires admin permissions on your account). See Managing API Authentication Credentials for details. In this case, the permissions you need are for sharing relationships - you need both read and write permissions:
If the permissions you need are not available in Studio, or if you prefer to get them directly from the OAuth API, use your choice of the Get Client Credentials documents listed below. Whichever option you choose, you will need to ask for the correct operation permissions. The following can be used with cURL or Postman to get the proper permissions:
"operations": [
    "video-cloud/videos/read",
    "video-cloud/videos/create",
"video-cloud/videos/update"]Create live job
First we will create the live job.
- For this step, you will submit a
POSTrequest to:https://api.bcovlive.io/v1/jobsUse the following as the request body:
{ "live_stream": true, "region": "us-west-2", "reconnect_time": 1800, "outputs": [ { "label": "hls720p", "live_stream": true, "width": 1280, "height": 720, "video_codec": "h264", "h264_profile": "high", "video_bitrate": 2100, "segment_seconds": 4, "keyframe_interval": 60 }, { "label": "hls540p", "live_stream": true, "width": 960, "height": 540, "video_codec": "h264", "h264_profile": "main", "video_bitrate": 1500, "segment_seconds": 4, "keyframe_interval": 60 }, { "label": "hls360p", "live_stream": true, "width": 640, "height": 360, "video_codec": "h264", "h264_profile": "main", "video_bitrate": 800, "segment_seconds": 4, "keyframe_interval": 60 } ] } - If you are using a REST client such as Insomnia or Postman, you will need to add the following headers for your request:
Key Value X-API-KEY YOUR API KEY Content-Type application/json Use the request body shown in step 1 above, and be sure to send the request using the POST method.
- The response from the API should look similar to this:
Sample response
{ "id": "15981d93877e490185e6ebc9af2c79a3", "outputs": [ { "id": "0-15981d93877e490185e6ebc9af2c79a3", "playback_url": "https://bcovlive-a.akamaihd.net/15981d93877e490185e6ebc9af2c79a3/us-west-2/profile_0/chunklist.m3u8", "playback_url_dvr": "https://bcovlive-a.akamaihd.net/15981d93877e490185e6ebc9af2c79a3/us-west-2/profile_0/chunklist_dvr.m3u8", "playback_url_vod": "https://bcovlive-a.akamaihd.net/15981d93877e490185e6ebc9af2c79a3/us-west-2/profile_0/chunklist_vod.m3u8", "label": "hls720p" }, { "id": "1-15981d93877e490185e6ebc9af2c79a3", "playback_url": "https://bcovlive-a.akamaihd.net/15981d93877e490185e6ebc9af2c79a3/us-west-2/profile_1/chunklist.m3u8", "playback_url_dvr": "https://bcovlive-a.akamaihd.net/15981d93877e490185e6ebc9af2c79a3/us-west-2/profile_1/chunklist_dvr.m3u8", "playback_url_vod": "https://bcovlive-a.akamaihd.net/15981d93877e490185e6ebc9af2c79a3/us-west-2/profile_1/chunklist_vod.m3u8", "label": "hls540p" }, { "id": "2-15981d93877e490185e6ebc9af2c79a3", "playback_url": "https://bcovlive-a.akamaihd.net/15981d93877e490185e6ebc9af2c79a3/us-west-2/profile_2/chunklist.m3u8", "playback_url_dvr": "https://bcovlive-a.akamaihd.net/15981d93877e490185e6ebc9af2c79a3/us-west-2/profile_2/chunklist_dvr.m3u8", "playback_url_vod": "https://bcovlive-a.akamaihd.net/15981d93877e490185e6ebc9af2c79a3/us-west-2/profile_2/chunklist_vod.m3u8", "label": "hls360p" }, { "id": "3-15981d93877e490185e6ebc9af2c79a3", "playlist_type": "defaultS3", "type": "playlist", "filename": "playlist.m3u8", "dvr_filename": "playlist_dvr.m3u8", "playback_url": "https://bcovlive-a.akamaihd.net/15981d93877e490185e6ebc9af2c79a3/us-west-2/playlist.m3u8", "playback_url_dvr": "https://bcovlive-a.akamaihd.net/15981d93877e490185e6ebc9af2c79a3/us-west-2/playlist_dvr.m3u8", "ssai_playback_urls": { "685b239f582c42fca49da33be4f2328e": { "playback_url": "https://bcovlive-a.akamaihd.net/15981d93877e490185e6ebc9af2c79a3/us-west-2/685b239f582c42fca49da33be4f2328e/playlist_ssaiM.m3u8", "playback_url_dvr": "https://bcovlive-a.akamaihd.net/15981d93877e490185e6ebc9af2c79a3/us-west-2/685b239f582c42fca49da33be4f2328e/playlist_dvr_ssaiM.m3u8", "playback_added_cdns": [], "description": "House Ads - a95ac581551b4478b27910e5675db1f8", "type": "ads" }, "c96e2d00d6744c65a3eddb15425e4a51": { "playback_url": "https://bcovlive-a.akamaihd.net/15981d93877e490185e6ebc9af2c79a3/us-west-2/counter/playlist_ssaiM.m3u8", "playback_url_dvr": "https://bcovlive-a.akamaihd.net/15981d93877e490185e6ebc9af2c79a3/us-west-2/counter/playlist_dvr_ssaiM.m3u8", "playback_added_cdns": [], "description": "House Counter - a95ac581551b4478b27910e5675db1f8", "type": "counter" } } } ], "stream_url": "rtmp://ep1-apse2.bcovlive.io:1935/15981d93877e490185e6ebc9af2c79a3", "stream_name": "alive", "encryption": {}, "playback_url": "https://bcovlive-a.akamaihd.net/15981d93877e490185e6ebc9af2c79a3/us-west-2/playlist.m3u8", "playback_url_dvr": "https://bcovlive-a.akamaihd.net/15981d93877e490185e6ebc9af2c79a3/us-west-2/playlist_dvr.m3u8", "ssai_playback_urls": { "685b239f582c42fca49da33be4f2328e": { "playback_url": "https://bcovlive-a.akamaihd.net/15981d93877e490185e6ebc9af2c79a3/us-west-2/685b239f582c42fca49da33be4f2328e/playlist_ssaiM.m3u8", "playback_url_dvr": "https://bcovlive-a.akamaihd.net/15981d93877e490185e6ebc9af2c79a3/us-west-2/685b239f582c42fca49da33be4f2328e/playlist_dvr_ssaiM.m3u8", "playback_added_cdns": [], "description": "House Ads - a95ac581551b4478b27910e5675db1f8", "type": "ads" }, "c96e2d00d6744c65a3eddb15425e4a51": { "playback_url": "https://bcovlive-a.akamaihd.net/15981d93877e490185e6ebc9af2c79a3/us-west-2/counter/playlist_ssaiM.m3u8", "playback_url_dvr": "https://bcovlive-a.akamaihd.net/15981d93877e490185e6ebc9af2c79a3/us-west-2/counter/playlist_dvr_ssaiM.m3u8", "playback_added_cdns": [], "description": "House Counter - a95ac581551b4478b27910e5675db1f8", "type": "counter" } } } - For our purposes, the important fields in the response are:
- stream_url (line 51)
- stream_name (line 52)
- playback_url (line 54)
You will need the values of these fields - from your own response - in the steps that follow.
Set up Video Cloud video
Now that we have the live stream information, we will set up a remote video in Video Cloud so that we can play it in a Brightcove Player.
In these steps, we set the video up using the CMS API, but this can also be done in Video Cloud Studio, if you prefer - see the alternative steps below.
If you are using Insomnia or Postman, you will need to set up OAuth2 authentication using your client credentials. See one of the following guides if you need help:
-
First, you will need to create a new video by making a
POSTrequest to:https://cms.api.brightcove.com/v1/accounts/account_id/videos -
The request body can include several pieces of metadata (see the API reference for details), but the only thing required is a
name:{ "name": "some name for your live stream" } -
The response will contain all the video metadata, but the important field is the
id, which you will need to add the remote asset. -
To add the HLS stream, you will make another
POSTrequest to:https://cms.api.brightcove.com/v1/accounts/account_id/videos/video_id/assets/hls_manifest -
This time, the request body will be:
{
    "remote_url": "playback_url for your live stream"
}
Add video to a player
Now we will create a simple HTML page and add a player to it with the video we just created.
- Create a simple HTML page to test the live stream player. You can include any other content you like, or none at all.
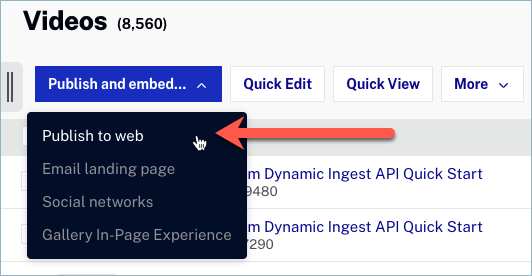
- In the Studio Media Module, select the video created in the previous steps and click Publish and Embed > Web Player:
Publish Video - In the Publish dialog, select a player (the Brightcove Default Player is fine):

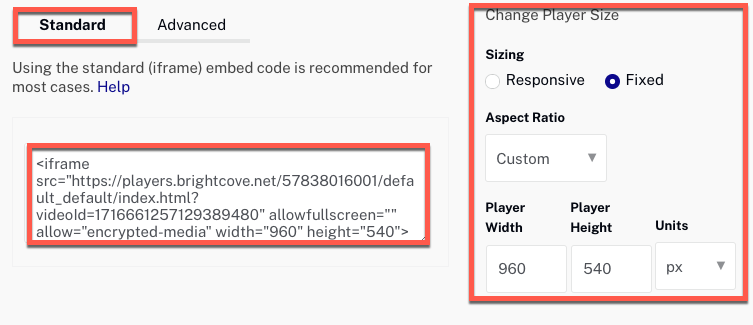
Select Player - Scroll down, set the size the player as you wish, and then click in code block to select the Standard player code - copy this code and paste into the body of your html page:
Get Publishing Code - Save your html page to a remote or local web server so that you can browse it.
- Open the page in your web browser. Since we haven't started steaming, you will see a media error:
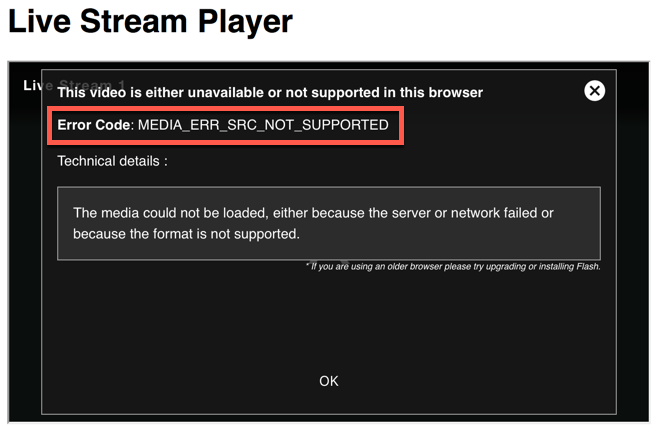
Media Error
cURL commands
This section provides alternative cURL commands for those who do not use a REST client such as Insomnia or Postman.
cURL for creating a live job
## Create Job - Simple
	curl -X "POST" "https://api.bcovlive.io/v1/jobs" \
	-H "X-API-KEY: YOUR_API_KEY_HERE" \
	-H "Content-Type: application/json" \
	-d $'{
	"outputs": [
	{
	"height": 720,
	"video_bitrate": 2100,
	"segment_seconds": 4,
	"keyframe_interval": 60,
	"width": 1280,
	"video_codec": "h264",
	"label": "hls720p",
	"h264_profile": "high",
	"live_stream": true
	},
	{
	"height": 540,
	"video_bitrate": 1500,
	"segment_seconds": 4,
	"keyframe_interval": 60,
	"width": 960,
	"video_codec": "h264",
	"label": "hls540p",
	"h264_profile": "main",
	"live_stream": true
	},
	{
	"height": 360,
	"video_bitrate": 800,
	"segment_seconds": 4,
	"keyframe_interval": 60,
	"width": 640,
	"video_codec": "h264",
	"label": "hls360p",
	"h264_profile": "main",
	"live_stream": true
	}
	],
	"region": "us-west-2",
	"reconnect_time": 1800,
	"live_stream": true
	}'
Copy the code into a text editor, and replace YOUR_API_KEY_HERE with your own api key. Then copy and paste the code at a command line and run it.
Use Studio to create the video
Here are alternative steps for creating the video in Studio.
- Login to Video Cloud Studio.
- Go to the Media Module.
- In the options on the left, click Add Remote Video:
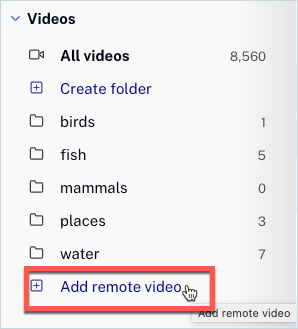
Add Remote Video Menu Item - In the Add Remote Video dialog, add a video name and copy and paste the value for the
playback_urlfrom the Live API response into the URL field. Then click Add Rendition, and Save: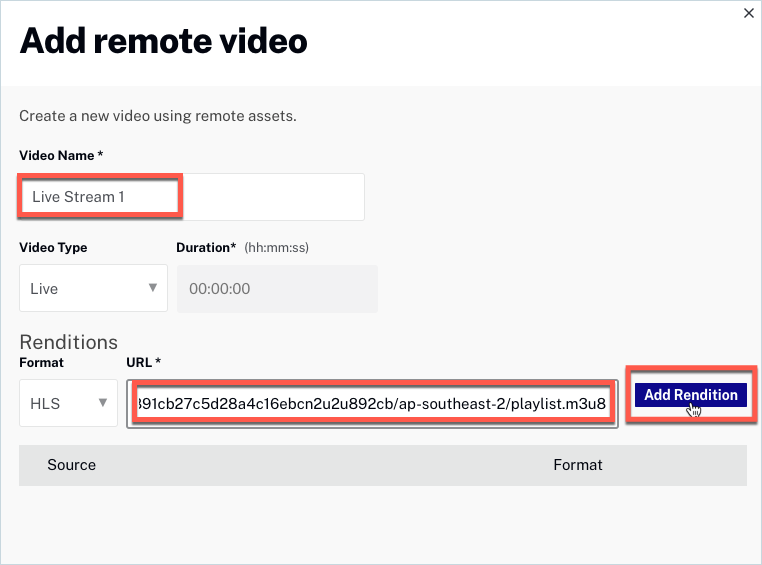
Add Rendition Dialog
Use Wirecast to stream an event
In this section, we will configure and use the Telestream Wirecast encoder to support a live streaming event. Telestream Wirecast software is a desktop application that captures input from your camera and produces a stream that can be delivered by a CDN. Note that there are hardware and other software based encoding solutions available that may be better suited for delivering your live streaming event. You can download a trial version of the Wirecast software from the Telestream website.
Note: You should have the Wirecast software installed and a camera connected to your computer before proceeding.
To configure Wirecast for a live event, follow these steps.
- Open Wirecast.
- Hover over the +, click Capture Devices and then select your camera.
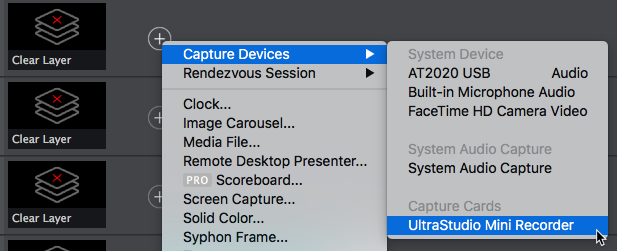
Selecting a camera - Click the arrow button (
 ) to make the camera shot the live shot.

Wirecast camera configuration - Click the Stream button (
 ). You will be prompted to configure the output settings.
 - Set the Destination to RTMP Server. Click OK.
- For the Address, use the stream_url returned from the Live API (step 3).
- For the Stream, use alive.
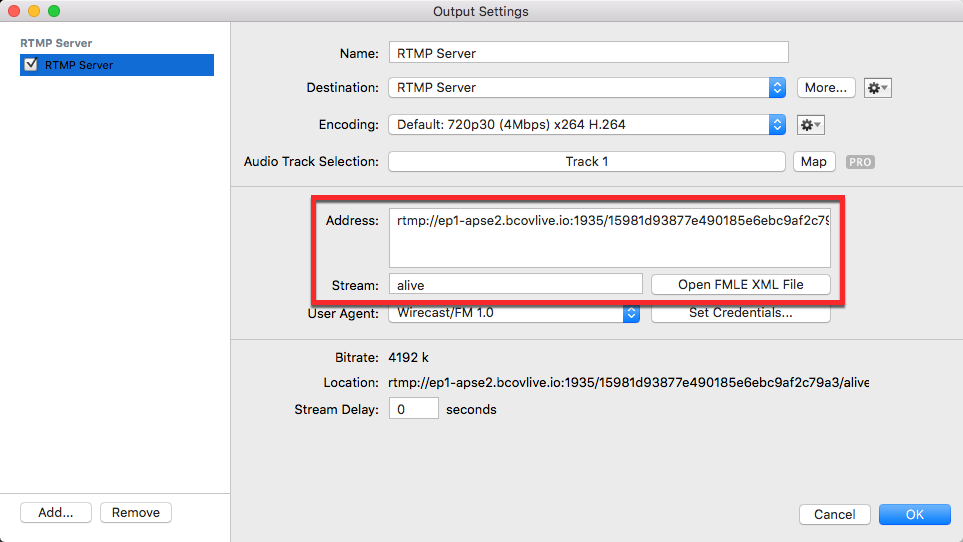
Wirecast output settings - (Optional) To create additional output streams, click Add... When creating additional output streams, you may wish to create your own custom encoding profile to control the output bitrate. Make sure that the Stream name reflects the new bitrate.
- Click OK to save the output settings.
- Click the Stream button ( ). The live stream should begin.
Conclusion
You are now ready to create a live streaming session. You need to add the following to your encoder configuration:
stream_url: add thestream_urlfrom your job (thertmpaddress)stream_name: the stream name must bealive
Once you start the live stream, you should see it show up in the Brightcove player you created in the earlier steps.