Overview
In order to publish players to a CDN, the Player Management API utilizes the Delivery System API. The Delivery System API allows you to create a git repository, the contents of which get hosted on players.brightcove.net. When a player is created, Brightcove creates a repository behind the scenes. Every time the player is re-published, whether directly requested by a publisher or when a Brightcove player update is released, there is a corresponding commit and push to that repository.
Git repositories, among other things, provide a history of changes over time. While debugging a player, it can sometimes be quite useful to get a copy of this repository so you can examine the change history yourself. First, you will learn how to retrieve general information about your player, using the command line tool curl and/or the Chrome plugin Postman. You will then learn how to see player history for creation and publishing.
Player information
Those comfortable on the command line will most likely want to use curl for getting player information, whereas those more comfortable with a GUI will choose the Postman option.
Using curl
If you are not familiar with curl and setting environment variables, read through the first two sections of the Step-by-Step: Player Management. Be sure the following environment variables are set:
- ACCOUNT_ID
- PLAYER_ID
You can then use the following curl statement to get information about your player.
      curl \
        --header "Content-Type: application/json" \
        --header "Authorization: Bearer $ACCESS_TOKEN" \
        --request GET \
        https://players.api.brightcove.com/v2/accounts/{{account_id}}/players//embeds/default
The API will return a response similar to the following:
      {
        "branches": {
        "master": {
        "video_cloud": true,
        "updated_at": "2015-02-23T18:36:39.323Z"
        },
        "preview": {
        "video_cloud": true,
        "updated_at": "2015-02-23T18:36:39.323Z"
        }
        },
        "publish_request": {
        "comment": "Player publish request",
        "author": "mboles@brightcove.com",
        "status": "COMPLETE",
        "requested_at": "2015-02-26T16:29:33.207Z",
        "queue_msg_id": "33533986-10d3-4585-8dcd-7ea52f3d2879",
        "errorCode": null,
        "errorMessage": null,
        "buildLog":
        "https://players.brightcove.net/1507807800001/0d92f482-49d9-44e6-ba1d-e2360dab838a_default/logs/33533986-10d3-4585-8dcd-7ea52f3d2879.log",
        "retries": 0,
        "elapsed_time": 12
        },
        "name": "MySamplePlayer",
        "id": "default",
        "url": "https://players.brightcove.net/1507807800001/0d92f482-49d9-44e6-ba1d-e2360dab838a_default/index.html",
        "embed_code": "<iframe
        src='//players.brightcove.net/1507807800001/0d92f482-49d9-44e6-ba1d-e2360dab838a_default/index.html'
        allowfullscreen webkitallowfullscreen mozallowfullscreen></iframe>",
        "embed_in_page":
        "https://players.brightcove.net/1507807800001/0d92f482-49d9-44e6-ba1d-e2360dab838a_default/in_page.embed",
        "repository_url":
        "https://repos.api.brightcove.com/v1/accounts/1507807800001/repos/0d92f482-49d9-44e6-ba1d-e2360dab838a_default",
        "preview_url":
        "https://preview-players.brightcove.net/v1/accounts/1507807800001/players/0d92f482-49d9-44e6-ba1d-e2360dab838a/master/embeds/default/preview/index.html",
        "preview_embed_code": "<iframe
        src='//preview-players.brightcove.net/v1/accounts/1507807800001/players/0d92f482-49d9-44e6-ba1d-e2360dab838a/master/embeds/default/preview/index.html'
        allowfullscreen webkitallowfullscreen mozallowfullscreen></iframe>"
        }
Using Postman
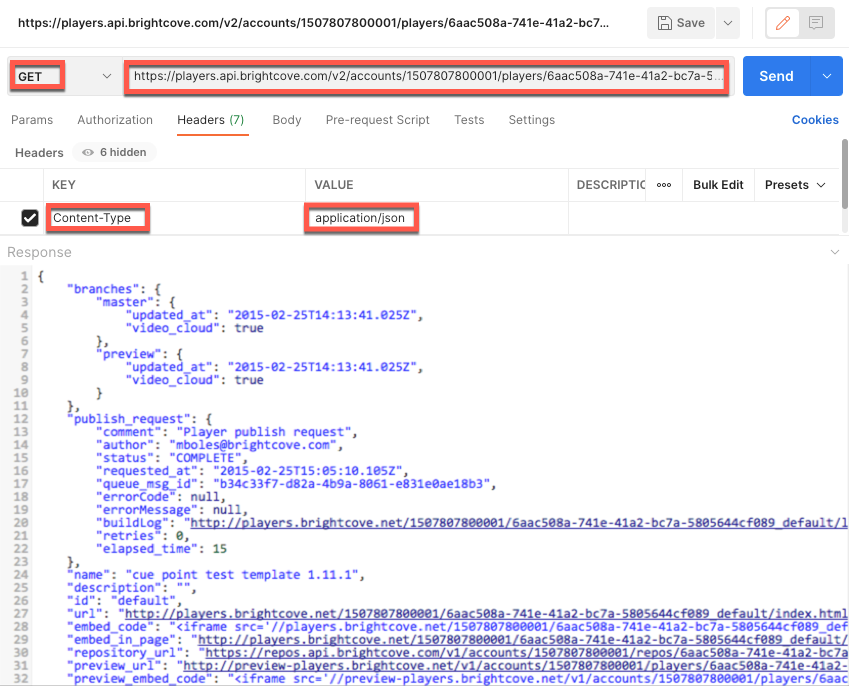
Postman provides a more friendly UI to interact with the API. If you are unfamiliar with Postman, read through the Use Postman for HTTP Requests doc for a basic understanding. You do not create environment variables when using Postman. Instead you build the URL location with appropriate values in the URL. For instance, the following shows an appropriate URL for use in Postman, containing account and player ID.
https://players.api.brightcove.com/v2/accounts/1507807800001/players/6aac508a-741e-41a2-bc7a-5805644cf089/embeds/default
To use Postman perform the following:
- Enter the URL at the top of the form.
- Set the HTTP method to GET.
- Create a header using Content-Type and the corresponding value application/json.
- Click the Send button.
- Enter your Studio credentials when prompted.
The response will then be returned. For ease of viewing, be sure to click the Pretty and JSON buttons just above the response.
Player history
In this section you will be using git commands. For a very brief tutorial on git, see the Git Overview document.
You will first clone a player repo. A directory will be created in the name of the player ID, in the directory
where you issue the git clone command.
- Open a Terminal/Command prompt and navigate to a location in which you want the folder created.
- Next, create a URL for the player repo in the form:
https://repos.api.brightcove.com/v1/accounts/ACCOUNT_ID/repos/PLAYER_ID_defaultExample:
https://repos.api.brightcove.com/v1/accounts/1507807800001/repos/0d92f482-49d9-44e6-ba1d-e2360dab838a_default - At the command prompt, create or move to a directory in which you want to clone the player repository.
- Once you are in that directory, enter the following git command to clone the player repository, substituting
your own account and player ids:
git clone https://repos.api.brightcove.com/v1/accounts/1507807800001/repos/0d92f482-49d9-44e6-ba1d-e2360dab838a_default - In the response, you should see something like the following:
Cloning into '0d92f482-49d9-44e6-ba1d-e2360dab838a_default'... remote: Counting objects: 39, done. remote: Compressing objects: 100% (31/31), done. remote: Total 39 (delta 13), reused 0 (delta 0) Unpacking objects: 100% (39/39), done. Checking connectivity... done. - At the command line (or in your file manager), locate the the cloned player directory to make sure it was
cloned to the desired location; it will be named as follows:
{player_id}_default - At the command line, change directories to the cloned player repository directory that you located in the previous step.
- Enter the command:
git log - You should see a response similar to the following:
commit b4ed1c2e3d429cc41b704fd44bebdc31f661a95c Author: bc86ece6-b3dd-4d78-a67d-93b503dc1c2e <mboles@brightcove.com> Date: Thu Feb 26 16:29:43 2015 +0000 Player publish request commit 6c854213b2b2597225c36212dc8be545fcf2c104 Author: bc86ece6-b3dd-4d78-a67d-93b503dc1c2e <mboles@brightcove.com> Date: Thu Feb 26 16:28:13 2015 +0000 Player publish request commit 7f78d49cb678259351f83a94e655f88607de077f Author: 6b112bd1-987c-41a2-84ac-f9dd8302b567 <mboles@brightcove.com> Date: Mon Feb 23 18:36:49 2015 +0000 Player created - The commit IDs will be used to get more detailed information. See Commit Information for more details.
Commit information
The following can be used to gather different information on player commits. Of course, you will need to substitute your particular commit IDs, which can be obtained from the player history response as shown in the previous section.
- Display specifics about a single commit (publish request)
git show e6e14ecda8e7790bf7d91e5e794507e776eef770 - Display differences between commits (publish requests)
git diff e6e14ecda8e7790bf7d91e5e794507e776eef770 64a28431b3727d798510343caacb263c2829572d - Display what files changed in each commit
git log --name-status