Overview
 Block Diagram
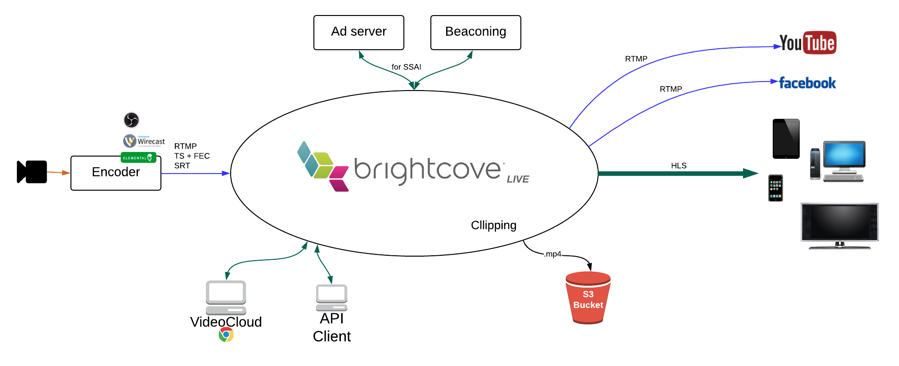
This tutorial explains at the API level how to create a live streaming job in Brightcove live that will accept MPEG2-TS input. The key to using MPEG2-TS input is to select a protocol that supports MPEG2-TS and that your encoder can deliver. The TS-capable protocols supported by the Live API are:
rtprtp-fecsrt
One of these protocols must be specified explicitly to use TS input, because the default input protocol is rtmp.
To use SMPTE timecodes for clipping, SSAI cue points, or ID3 tags, they should be inserted in the H.264 (AVC) video in SEI Picture Timing messages.
Remember that these protocols use UDP (User Datagram Protocol) rather than TCP for communication between the encoder and Live, so your firewall / router needs to be configured properly and allow UDP outputs to the internet from the encoder's IP.
If you are using rtp-fec, FEC information is sent on a different port than the media, so, for example, if you are using port 2000, you would also need to open ports 2002 and 2004 (if you are using 2D FEC).
This tutorial will use curl to make the API requests, but you can easily make them in Insomnia, Postman or other REST clients instead.
Create a live job
First, we will create a live job. You will need an API-KEY for the Live API. If you do not, and are interested in obtaining access, please contact your Customer Success Manager.
-
Copy and paste the following curl command into a text editor:
curl -X POST \ https://api.bcovlive.io/v1/jobs \ -H 'Content-Type: application/json' \ -H 'x-api-key: ' \ -d '{ "live_stream": true, "region": "", "protocol": "", "cidr_whitelist": ["", ""], "outputs": [{ "label": "hls360p", "live_stream": true, "height": 360, "video_bitrate": 365, "segment_seconds": 6, "keyframe_interval": 60 }, { "label": "hls432p", "live_stream": true, "height": 432, "video_bitrate": 730, "segment_seconds": 6, "keyframe_interval": 60 }, { "label": "hls540p", "live_stream": true, "height": 540, "video_bitrate": 2000, "segment_seconds": 6, "keyframe_interval": 60 }, { "label": "hls720p3M", "live_stream": true, "height": 540, "video_bitrate": 2000, "segment_seconds": 6, "keyframe_interval": 60 }, { "label": "hls720p4.5M", "live_stream": true, "height": 720, "video_bitrate": 4500, "segment_seconds": 6, "keyframe_interval": 60 }] }' -
Make the following replacements:
with your Brightcove live API key. For example:abcdfeg-this-is-a-fake-api-key-FgJajjasd12hJHsZwith the closest available region to your encoder, see closest available regions to your encoder. For instance:us-west-2with the input protocol your encoder will be delivering:rpt,rtp-fec, orsrtwith the IP range your encoder will be using, in the form of1.2.3.4/32(if any) with the IP range your backup encoder will be using, in the form of1.2.3.4/32
- After making those changes, copy and paste the code into Terminal or whatever command-line app you use and run it.
-
The response should be something like this if you are using the
rtp-fecprotocol:{ "id": "42c913e5373844a99a6285367f2704ec", "outputs": [... removed for simplicity ...], "stream_url": "rtp://ec2-34-212-0-224.us-west-2.compute.amazonaws.com:12675", "stream_name": "42c913e5373844a99a6285367f2704ec.stream", "static": false, "encryption": {}, "playback_url": "https://bcovlive-a.akamaihd.net/42c913e5373844a99a6285367f2704ec/us-west-2/NA/playlist.m3u8", "playback_url_dvr": "https://bcovlive-a.akamaihd.net/42c913e5373844a99a6285367f2704ec/us-west-2/NA/playlist_dvr.m3u8" }Or like this for
srt:{ "id": "cdb820f2d7764b91a79536dac799fb77", "outputs": [... removed for simplicity ...], "stream_url": "srt://ec2-34-212-0-224.us-west-2.compute.amazonaws.com:13820", "stream_name": "cdb820f2d7764b91a79536dac799fb77.stream", "static": false, "encryption": {}, "playback_url": "https://bcovlive-a.akamaihd.net/cdb820f2d7764b91a79536dac799fb77/us-west-2/NA/playlist.m3u8", "playback_url_dvr": "https://bcovlive-a.akamaihd.net/cdb820f2d7764b91a79536dac799fb77/us-west-2/NA/playlist_dvr.m3u8" }
This jobs will create 5 renditions based on Apple recommendations.
Configure your encoder (TS+FEC)
The steps shown here will assume an Elemental live box encoder, which was used in testing the steps for this tutorial. If you have a different encoder, the settings should be similar.
The most important settings for this rtp-fec input are:
- Configure timecode source as "system clock"
- Set "Forward error correction" to "Column and Row" and set "Column Depth" and "Row length" values:
- Colunm depth: 4 (1 extra FEC packet will be added every "Column Depth" TS packets)
- Row length: 10 (1 extra FEC packet will be added every "Row length" TS packets)
- Additional data added can be calculated: TotalBitrate = MediaBitrate * (1/(ColumnDepth + 1) + 1/(RowLength + 1)
- Check "time code insertion" inside video
- Strongly recommended: Framerate = follow source
This is the config we used for this TS+FEC sample:

Configure your encoder (SRT)
The setup shown here is based on a Haivision KB encoder, which was used in testing the steps for this tutorial. If you have a different encoder, the settings should be similar.
This is the config we used for this SRT sample:

Test playback
You can use this VideoJS HLS demo page to test playback, just paste the value playback_url returned in the creation job response:
